Example - Subscribe Users to Newsletter Using Resend
In this guide, we show how to subscribe users to your newsletter managed by Resend in Suppa
Step 1 - Set Up Resend Audience
Resend provides a simple way to manage your email marketing campaigns and audience. You can create an audience and add subscribers to it.
Once you have completed the signup process, go to your dashboard and click on the
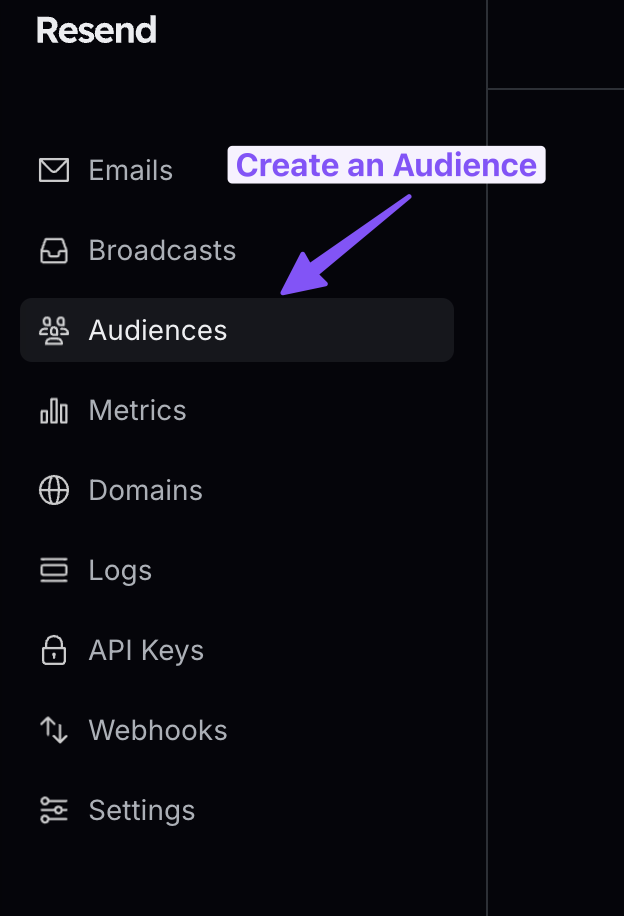
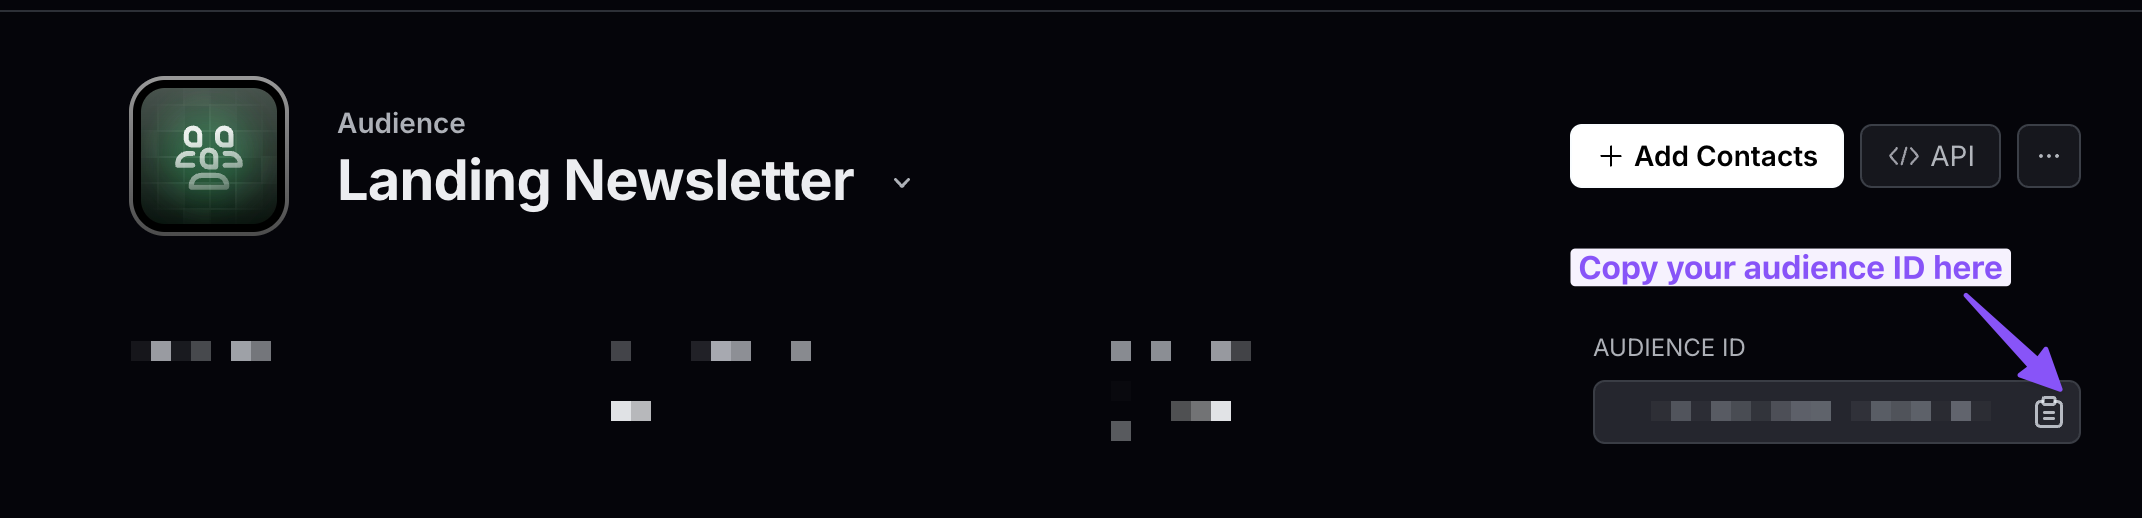
Create a new audience add copy the audience ID as you will need it to subscribe users to your newsletter.
Finally, go to the API Keys section to generate an API key. Copy the generated API key as you will need it to authenticate your requests from Suppa to the Resend API.
Step 2 - Define the OpenAPI Schema
To add the Resnd API to Suppa, we need an OpenAPI schema that defines the structure of the API request.
Luckily, Resend provides a yaml OpenAPI schema that we can use to define the API in Suppa.
Convert YAML to JSON
Unfortunately, Suppa does not support yaml OpenAPI schemas yet. We need to convert the yaml schema to json format. You can use an online tool like YAML to JSON to convert the schema.
{
  "openapi": "3.1.0",
  "info": {
    "title": "Resend API - Add Contact to Audience",
    "version": "1.1.0",
    "description": "API endpoint for adding a new contact to an audience in Resend."
  },
  "servers": [
    {
      "url": "https://api.resend.com"
    }
  ],
  "paths": {
    ...
  }
}
Add the Authentication Key as Header Parameter
To authenticate our requests to the Resend API, we need to make the API key as a required header parameter in the OpenAPI schema.
This way we can pass the API key in the request headers field when setting up the API action in Suppa.
To achieve this, we add a new entry into the parameters array in the OpenAPI schema.
{
  ...
  "paths": {
    "/audiences/{audience_id}/contacts": {
      "post": {
        "summary": "Add a new contact to an audience",
        "parameters": [
          ...
          {
            "name": "Authorization",
            "in": "header",
            "required": true,
            "schema": {
              "type": "string",
              "description": "Bearer token for authentication."
            },
            "example": "Bearer re_123456789"
          },
        ...
        ],
        ...
      }
    }
  }
}
Now that we have defined the OpenAPI schema for the Resend, we can add it to Suppa.
You can find the complete OpenAPI schema to add a new contact to an existing audience in Resend below:
OpenAPI Schema for Resend API to add contact to the audience
{
  "openapi": "3.1.0",
  "info": {
    "title": "Resend API - Add Contact to Audience",
    "version": "1.1.0",
    "description": "API endpoint for adding a new contact to an audience in Resend."
  },
  "servers": [
    {
      "url": "https://api.resend.com"
    }
  ],
  "paths": {
    "/audiences/{audience_id}/contacts": {
      "post": {
        "summary": "Add a new contact to an audience",
        "parameters": [
          {
            "name": "audience_id",
            "in": "path",
            "required": true,
            "schema": {
              "type": "string",
              "description": "The Audience ID."
            }
          },
          {
            "name": "Authorization",
            "in": "header",
            "required": true,
            "schema": {
              "type": "string",
              "description": "Bearer token for authentication."
            },
            "example": "Bearer re_123456789"
          }
        ],
        "requestBody": {
          "content": {
            "application/json": {
              "schema": {
                "$ref": "#/components/schemas/CreateContactOptions"
              }
            }
          }
        },
        "responses": {
          "201": {
            "description": "Created",
            "content": {
              "application/json": {
                "schema": {
                  "$ref": "#/components/schemas/CreateContactResponseSuccess"
                }
              }
            }
          },
          "401": {
            "description": "Unauthorized"
          }
        }
      }
    }
  },
  "components": {
    "schemas": {
      "CreateContactOptions": {
        "type": "object",
        "required": [
          "email"
        ],
        "properties": {
          "email": {
            "type": "string",
            "description": "Email address of the contact.",
            "example": "steve.wozniak@gmail.com"
          },
          "first_name": {
            "type": "string",
            "description": "First name of the contact.",
            "example": "Steve"
          },
          "last_name": {
            "type": "string",
            "description": "Last name of the contact.",
            "example": "Wozniak"
          },
          "unsubscribed": {
            "type": "boolean",
            "description": "Indicates if the contact is unsubscribed.",
            "example": true
          }
        }
      },
      "CreateContactResponseSuccess": {
        "type": "object",
        "properties": {
          "object": {
            "type": "string",
            "description": "Type of the response object.",
            "example": "contact"
          },
          "id": {
            "type": "string",
            "description": "Unique identifier for the created contact.",
            "example": "479e3145-dd38-476b-932c-529ceb705947"
          }
        }
      }
    }
  }
}
Step 3 - Add the Resend API Action to Suppa
Now that we have defined the OpenAPI schema for the Resend API, we can add it to Suppa as an API action.
- Navigate to the Action management section in your Suppa dashboard.
- Click on the "Setup API" button to open the setup modal.
- Fill in the following fields:

Since the Resend API requires an API key for authentication and an Audience ID to manage the list, we use the server-side action type to prevent exposing these sensitive details to the client-side.
Step 4 - Use Action in Canvas
Once you have added the Resend API action to Suppa, you can use it in the Canvas to subscribe users to your newsletter.
Here is a sample flow to subscribe a user to your newsletter using the Resend API:
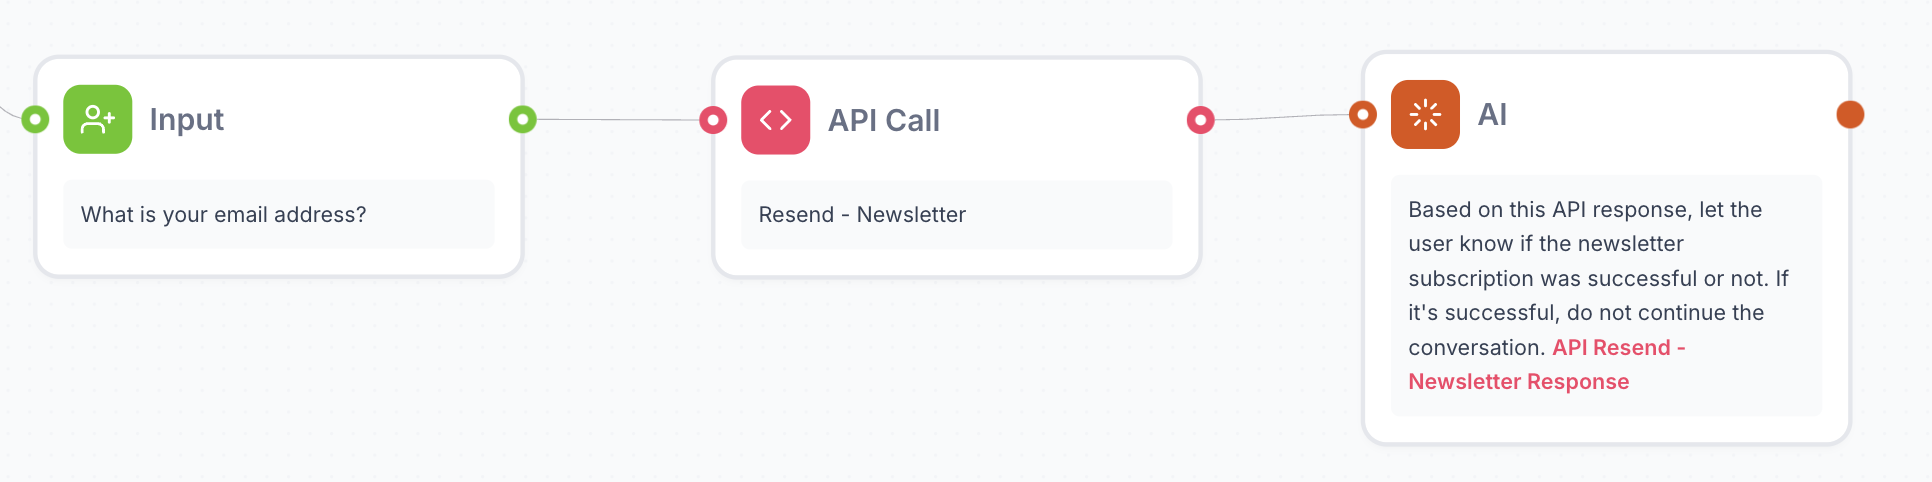
- Ask User for Email: The flow starts by asking the user for their email address. We use the
Inputnode to capture with an emailRegexused as the validation to capture the user's email. - Add Contact to Audience: The user's email address is then used to add the user to your newsletter audience using the Resend API action.
- Display Success Message with AI: Finally, a success message is displayed to the user confirming their subscription. We let AI handle this part to provide a more conversational experience.
Ask User for Email
You can ask the user for an email address to subscribe them to your newsletter using the Input node. Here we use the email Regex as the validation to capture the user's email.
Add Resend API Action
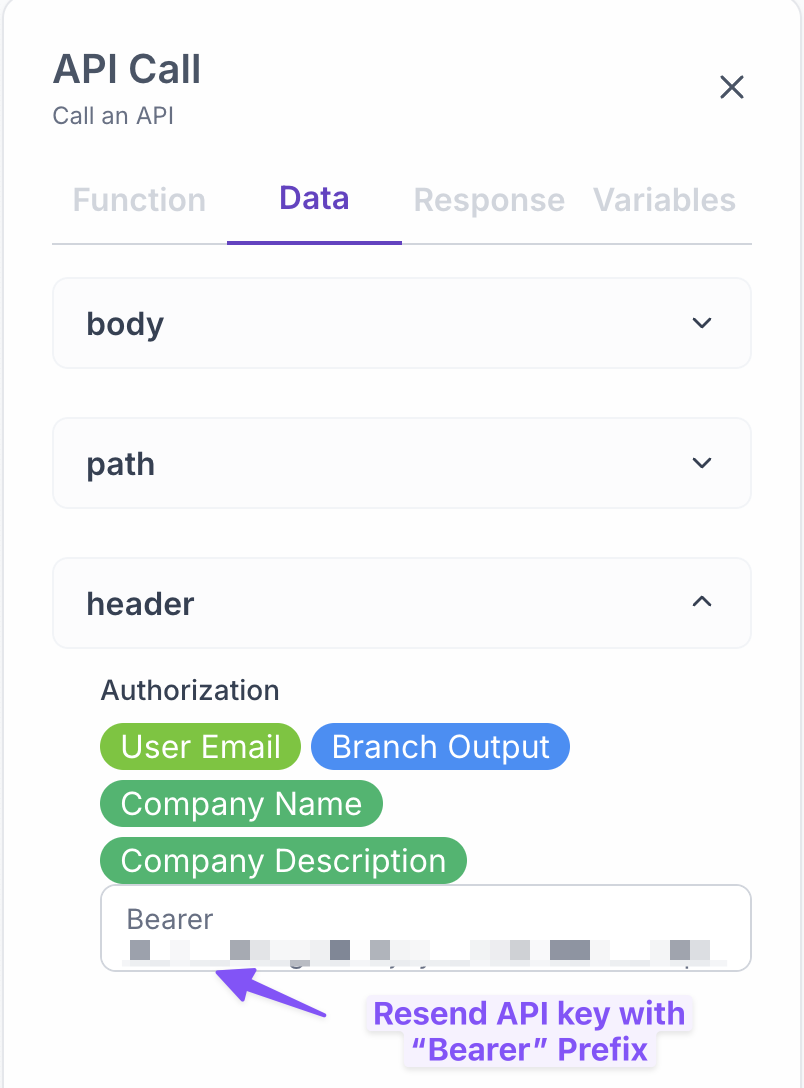
Next, add the Resend API action to the flow to subscribe the user to your newsletter.
We first need to setup the header parameters for the API key and content type. Do not forget to add Bearer before your
API key as Resend expects it in this format.
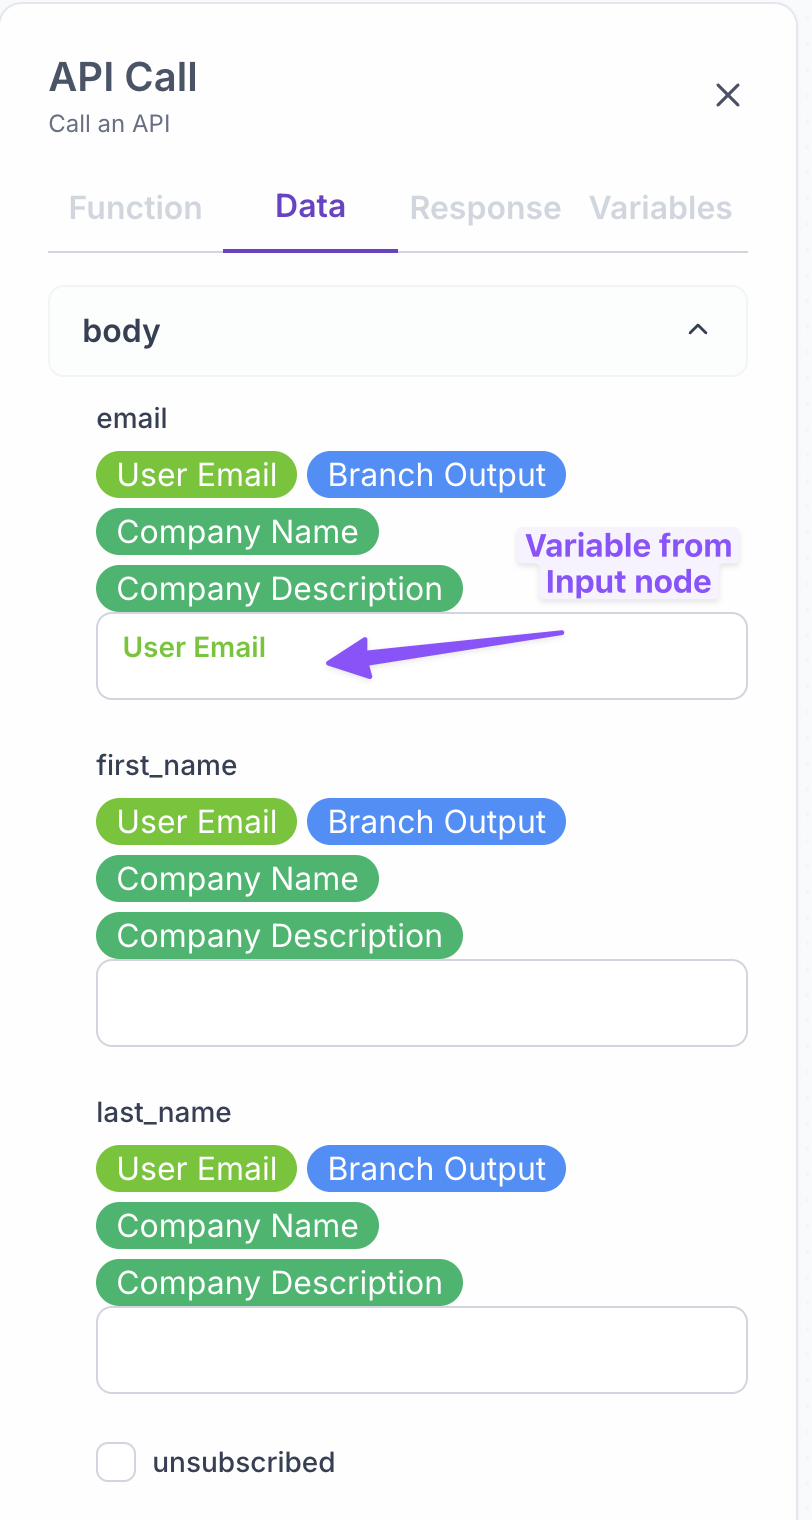
Then, we set the request body parameters for the API call. Here we use the User Email variable which is the email address provided by the user in the Input node.
We leave the First Name and Last Name fields empty as they are optional, but you can always add more Input nodes to capture this information.
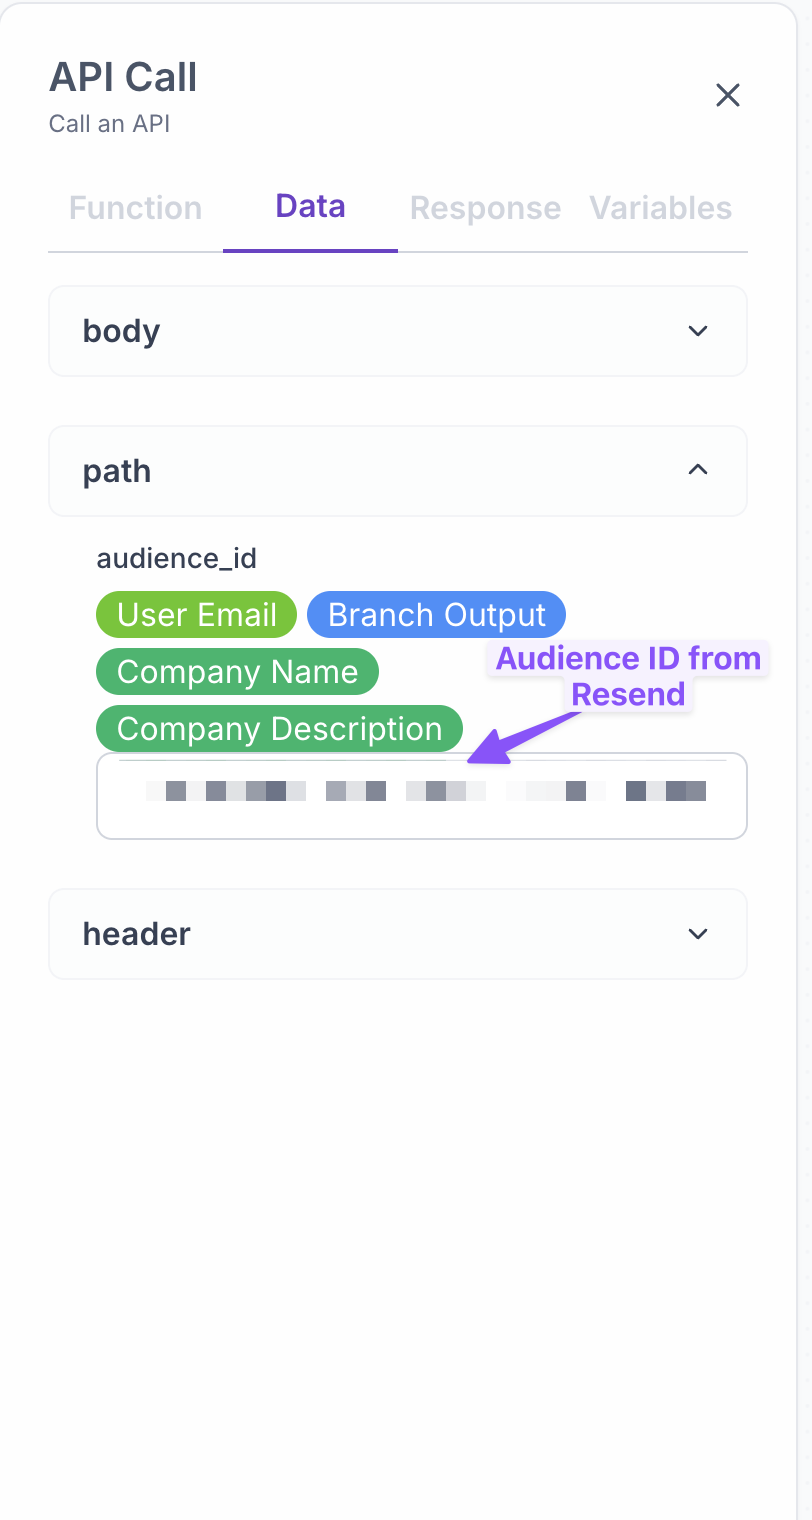
Finally, we add the Auidence ID as a path parameter in the API call. This is the ID of the audience you want to add the user to.
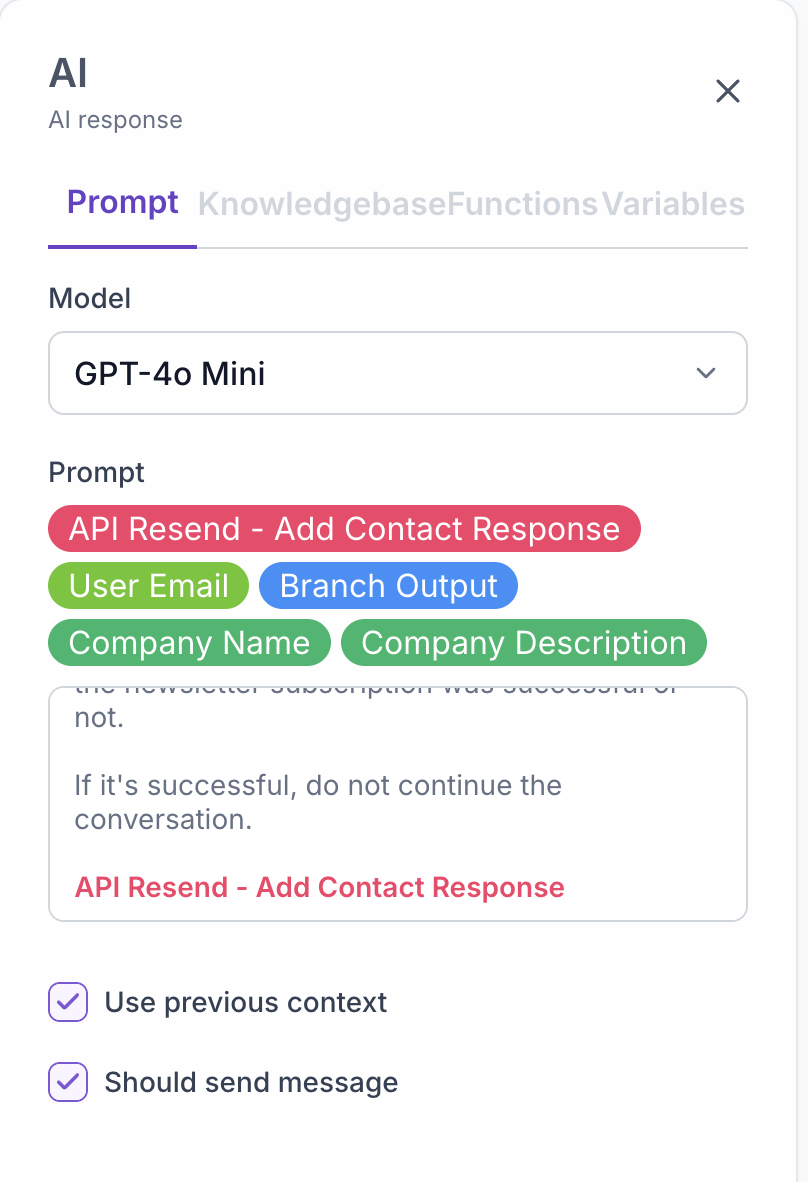
Display Success Message with AI
After the user is successfully subscribed to your newsletter, you can display a success message to the user using the AI node. We pass the response from the Resend API to the AI node and instruct it to display a message accordingly.
This provides a more conversational experience to the user. Also, you can use this to better convey the error messages if the subscription fails.
Demo Video
Here is a quick demo showing the flow in action. You can see the user is immediately subscribed to the newsletter after providing their email address.
Conclusion
We have successfully added the Resend API to Suppa and used it to subscribe users to your newsletter.
You can adapt this example to integrate other APIs and services into your Suppa assistant to provide a wide range of functionalities to your users. Happy building!