Example - Generate Images with FLUX Schnell Using Fal.ai
In this guide, we show how to add image generation to your Suppa digital assistant using the FLUX Schnell API from Fal.ai.
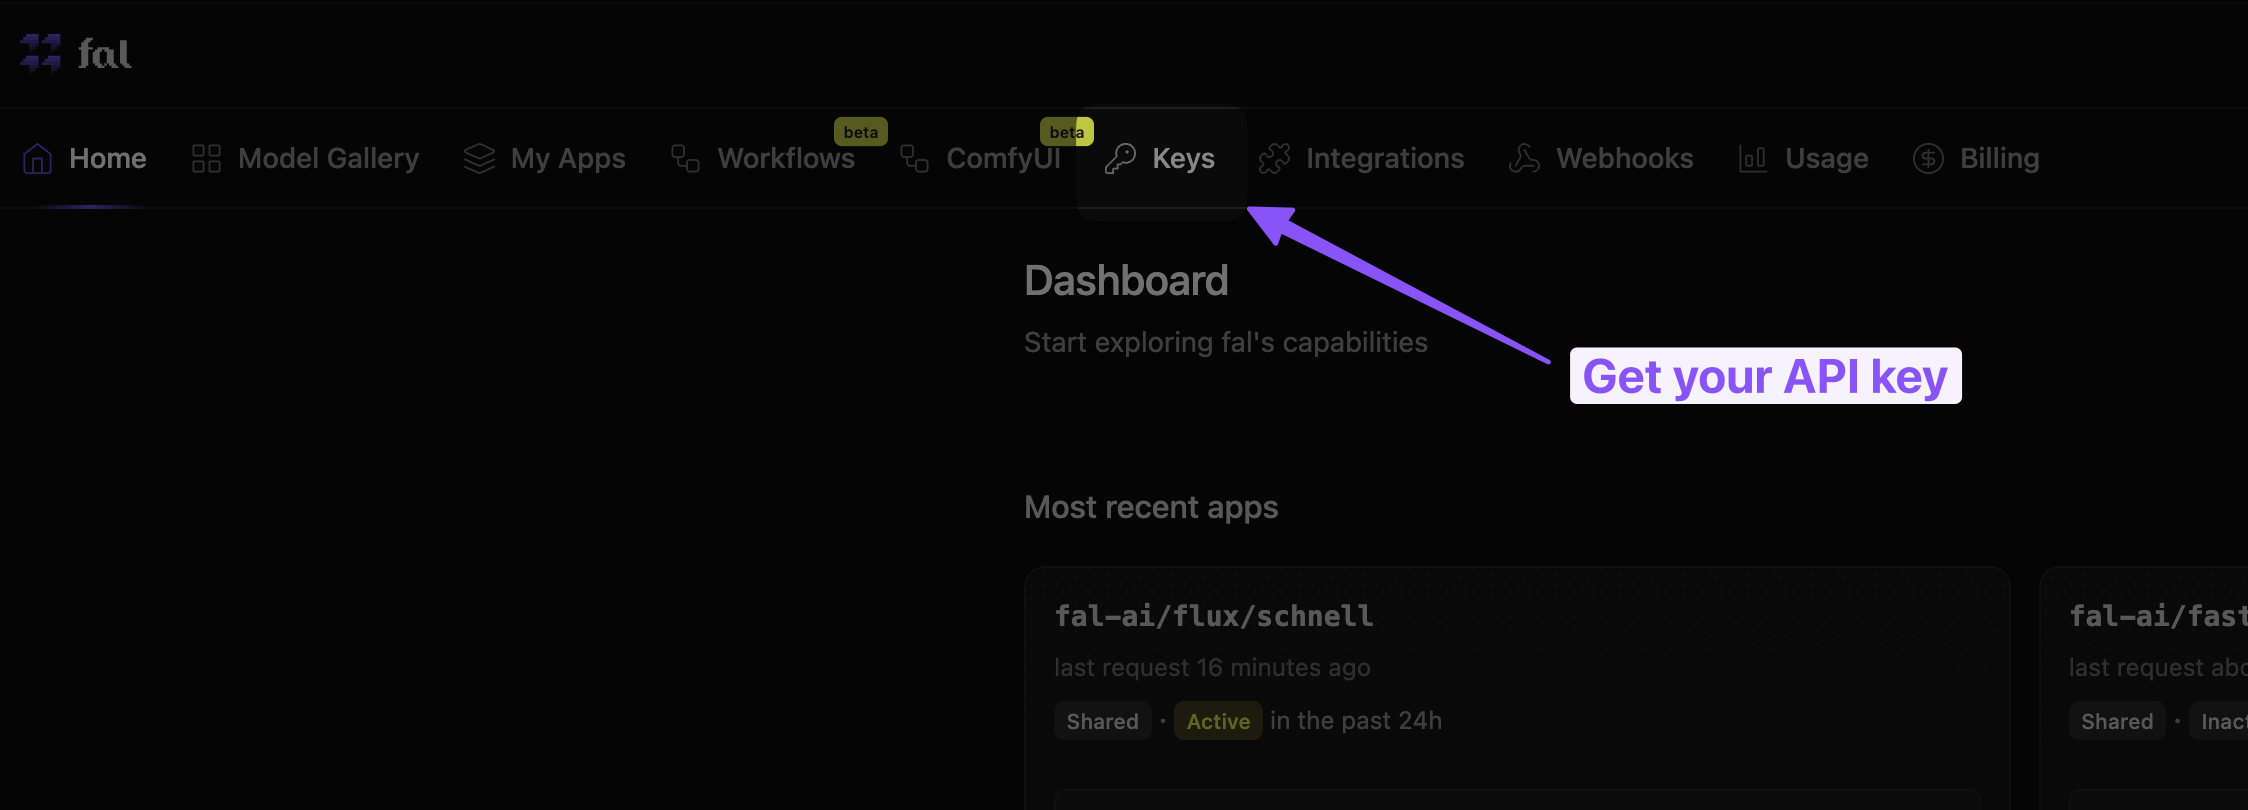
Step 1 - Get Your Fal.ai API Key
To use the FLUX Schnell API, you need to sign up for an account on Fal.ai and get your API key.
Once you have completed the signup process, go to your dashboard and click on the Keys tab.
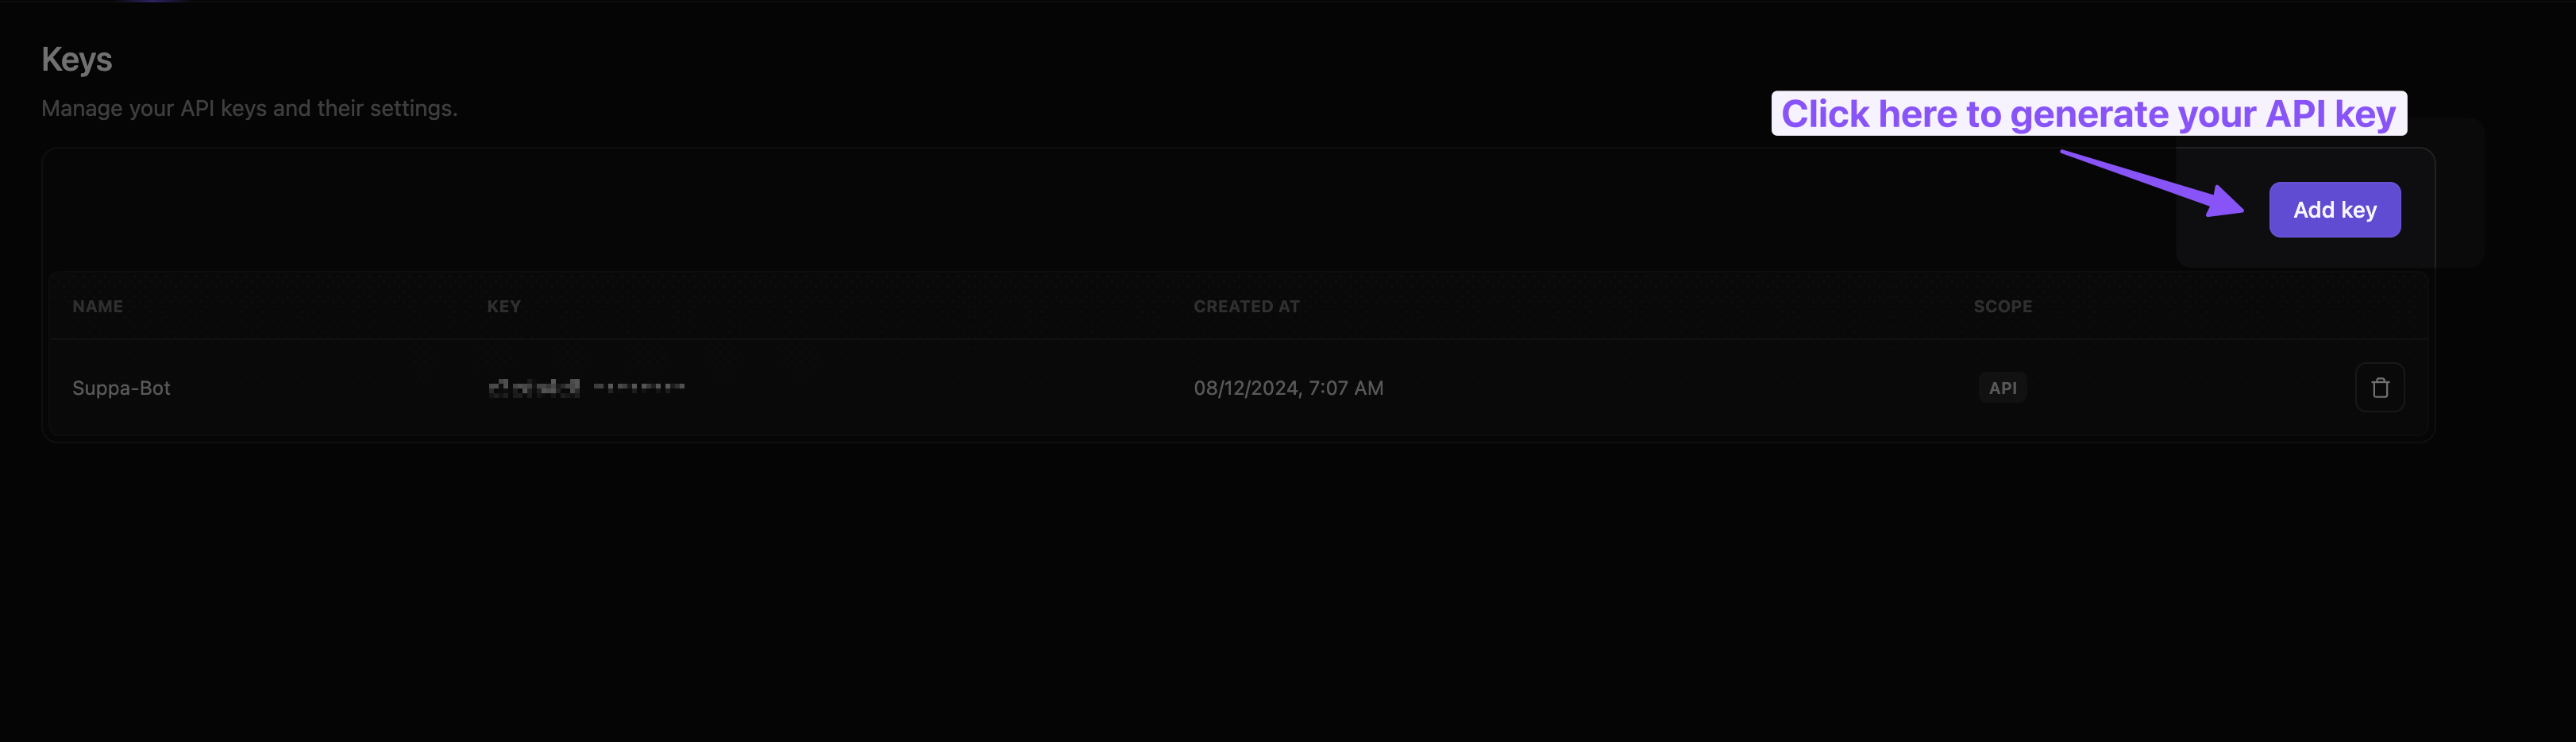
Click on the "Add Key" button to generate a new API key.
Select the "API" option and give your key a name. Click on the "Create Key" button to generate the key.
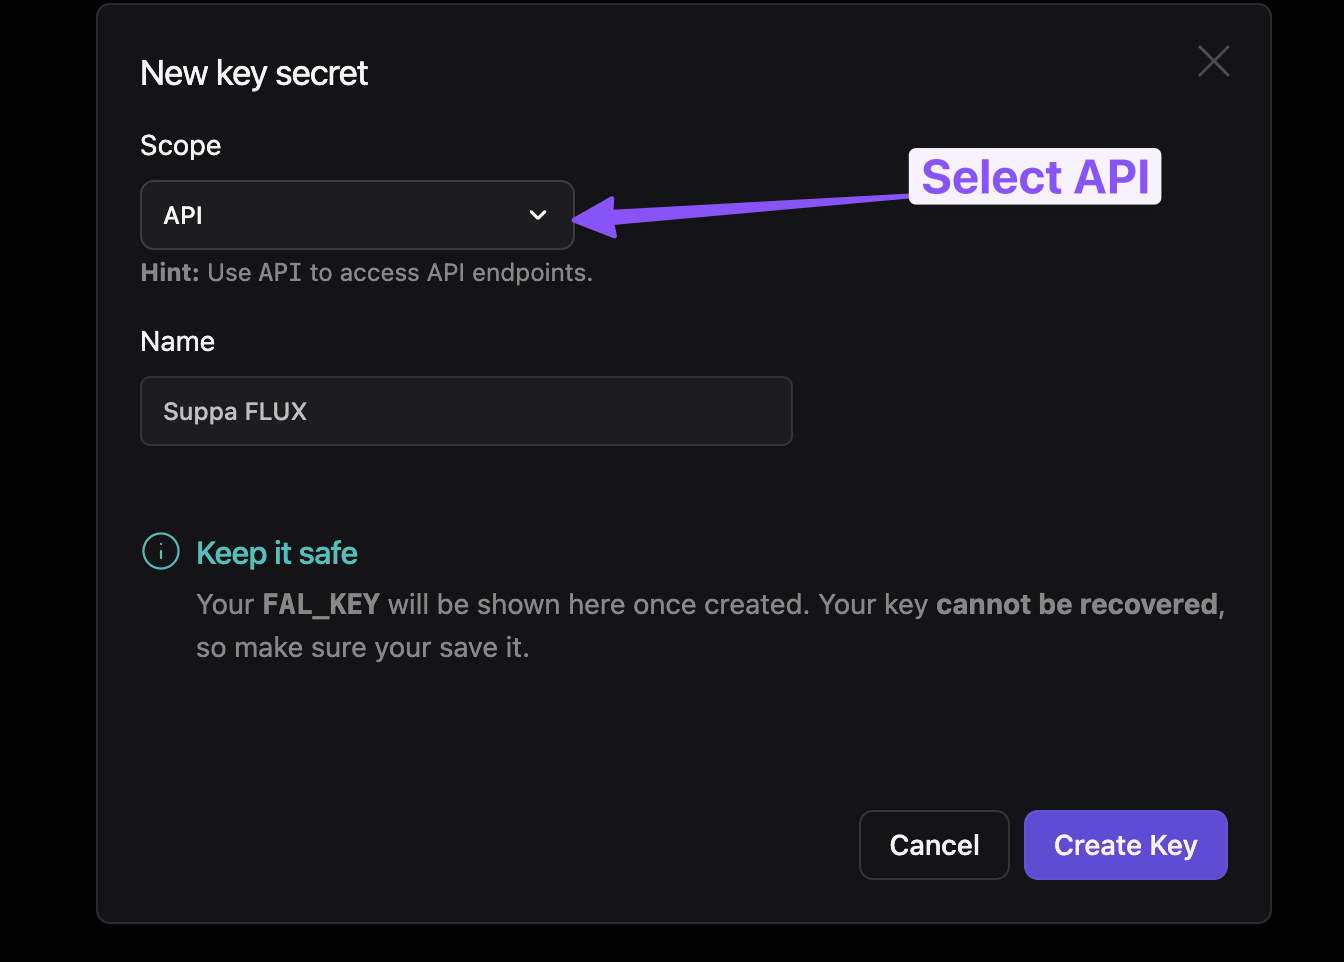
Copy the generated API key as you will need it to authenticate your requests from Suppa to the FLUX Schnell API.
Step 2 - Convert Fal.ai API to OpenAPI Schema
To add the FLUX Schnell API to Suppa, you need to convert the Fal.ai API into an OpenAPI schema.
To achieve that, we need to understand the structure of the API and define the request and response parameters.
Understanding the API Structure
The FLUX Schnell API from Fal.ai allows you to generate images using a simple API call.
As you can see, we can specify the prompt, image_size, image_format, and other parameters to generate the desired image.
Let us define the OpenAPI schema for this API.
Define the OpenAPI Schema
For this example, we will use the OpenAPI 3.1.0 specification to define the schema for the FLUX Schnell API.
First, we define the basic information about the API, such as the title and version. We also specify the server URL where the API is hosted.
{
  "openapi": "3.1.0",
  "info": {
    "title": "Fal.ai FLUX Schnell API",
    "version": "1.0.0"
  },
  "servers": [
    {
      "url": "https://fal.run"
    }
  ],
  ...
}
Now, we define the paths for the API. In this case, we have a single path /fal-ai/flux/schnell that accepts a POST request.
...
"paths": {
    "/fal-ai/flux/schnell": {
    "post": {
        "summary": "Flux-Schnell",
        "description": "Flux-Schnell",
        "operationId": "fluxSchnell",
        "security": [
        {
            "ApiKeyAuth": []
        }
        ],
        "parameters": [
        {
            "in": "header",
            "name": "Authorization",
            "schema": {
            "type": "string"
            },
            "required": true,
            "description": "API key authentication. Format: Key {API_KEY}"
        },
        {
            "in": "header",
            "name": "Content-Type",
            "schema": {
            "type": "string",
            "enum": ["application/json"]
            },
            "required": true,
            "description": "Content type of the request body"
        }
        ],
        "requestBody": {
        "content": {
            "application/json": {
            "schema": {
                "$ref": "#/components/schemas/FluxSchnellRequest"
            }
            }
        },
        "required": true
        },
        "responses": {
        "200": {
            "description": "Successful response",
            "content": {
            "application/json": {
                "schema": {
                "$ref": "#/components/schemas/FluxSchnellResponse"
                }
            }
            }
        }
        }
    }
    }
},
...
We've added a header parameter Authorization to pass the API key we obtained from Fal.ai. This is required for authentication.
Define the Request Body and Response Schemas
Note that we've passed the request body schema FluxSchnellRequest and the response schema FluxSchnellResponse to the paths. These schemas define the structure of the request and response payloads.
We define these schemas in the components section of the OpenAPI schema. We specify the properties, types, and descriptions for each schema following the specifications in Fal.ai docs.
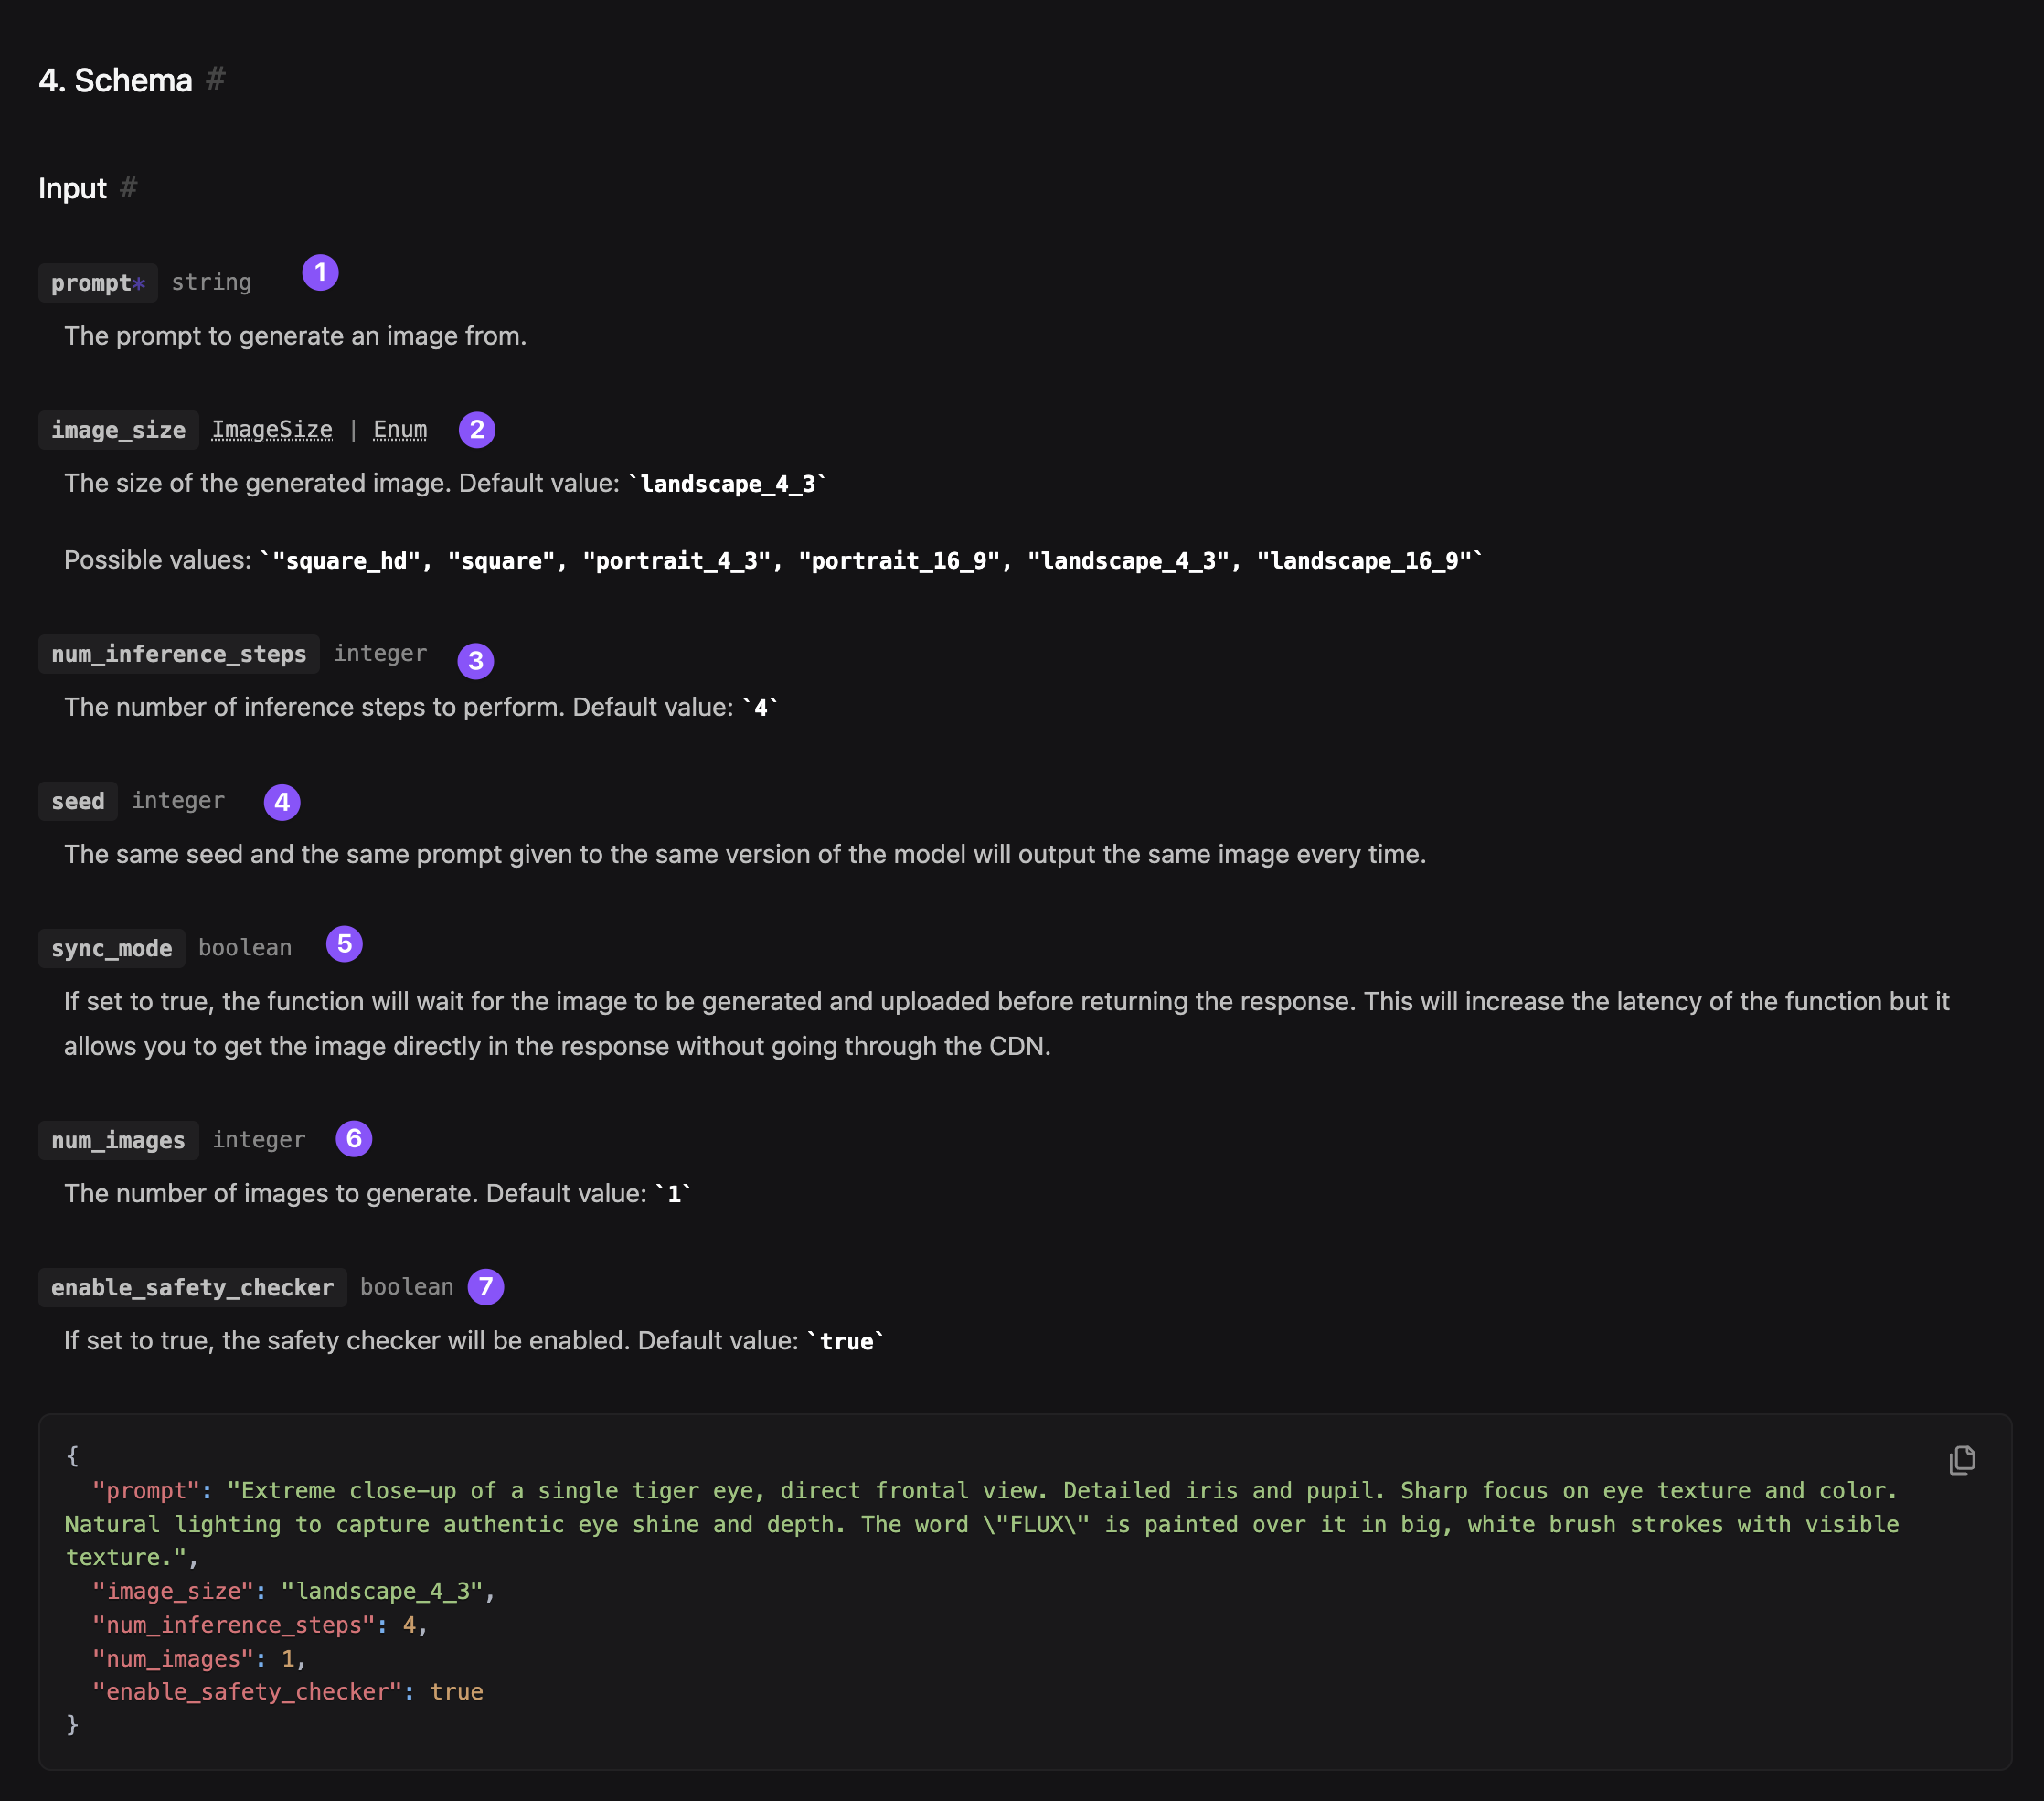
The Schema section of the Fal.ai API documentation provides detailed information about the request body structure for us.
Similarly, the Output section provides details about the response structure.
Here is the OpenAPI schema for the request and response:
...
  "components": {
    "schemas": {
      "FluxSchnellRequest": {
        "type": "object",
        "properties": {
          "prompt": {
            "type": "string",
            "description": "The prompt to generate an image from.",
            "example": "Extreme close-up of a single tiger eye, direct frontal view. Detailed iris and pupil. Sharp focus on eye texture and color. Natural lighting to capture authentic eye shine and depth. The word \"FLUX\" is painted over it in big, white brush strokes with visible texture."
          },
          "image_size": {
            "type": "string",
            "enum": ["square_hd", "square", "portrait_4_3", "portrait_16_9", "landscape_4_3", "landscape_16_9"],
            "default": "landscape_4_3",
            "description": "The size of the generated image."
          },
          "num_inference_steps": {
            "type": "integer",
            "default": 4,
            "description": "The number of inference steps to perform."
          },
          "seed": {
            "type": "integer",
            "description": "The same seed and the same prompt given to the same version of the model will output the same image every time."
          },
          "sync_mode": {
            "type": "boolean",
            "description": "If set to true, the function will wait for the image to be generated and uploaded before returning the response. This will increase the latency of the function but it allows you to get the image directly in the response without going through the CDN."
          },
          "num_images": {
            "type": "integer",
            "default": 1,
            "description": "The number of images to generate."
          },
          "enable_safety_checker": {
            "type": "boolean",
            "default": true,
            "description": "If set to true, the safety checker will be enabled."
          }
        },
        "required": ["prompt"]
      },
      "FluxSchnellResponse": {
        "type": "object",
        "properties": {
          "images": {
            "type": "array",
            "items": {
              "type": "object",
              "properties": {
                "url": {
                  "type": "string"
                },
                "width": {
                  "type": "integer"
                },
                "height": {
                  "type": "integer"
                },
                "content_type": {
                  "type": "string"
                }
              }
            }
          },
          "timings": {
            "type": "object",
            "properties": {
              "inference": {
                "type": "number"
              }
            }
          },
          "seed": {
            "type": "integer"
          },
          "has_nsfw_concepts": {
            "type": "array",
            "items": {
              "type": "boolean"
            }
          },
          "prompt": {
            "type": "string"
          }
        }
      }
    },
    "securitySchemes": {
      "ApiKeyAuth": {
        "type": "apiKey",
        "in": "header",
        "name": "Authorization",
        "description": "API key authentication. Format: Key {API_KEY}"
      }
    }
  }
Now that we have defined the OpenAPI schema for the FLUX Schnell API, we can add it to Suppa.
You can find the complete OpenAPI schema for the FLUX Schnell API below:
OpenAPI Schema for Fal.ai FLUX Schnell API
{
  "openapi": "3.1.0",
  "info": {
    "title": "Fal.ai FLUX Schnell API",
    "version": "1.0.0"
  },
  "servers": [
    {
      "url": "https://fal.run"
    }
  ],
  "paths": {
    "/fal-ai/flux/schnell": {
      "post": {
        "summary": "Flux-Schnell",
        "description": "Flux-Schnell",
        "operationId": "fluxSchnell",
        "security": [
          {
            "ApiKeyAuth": []
          }
        ],
        "parameters": [
          {
            "in": "header",
            "name": "Authorization",
            "schema": {
              "type": "string"
            },
            "required": true,
            "description": "API key authentication. Format: Key {API_KEY}"
          },
          {
            "in": "header",
            "name": "Content-Type",
            "schema": {
              "type": "string",
              "enum": ["application/json"]
            },
            "required": true,
            "description": "Content type of the request body"
          }
        ],
        "requestBody": {
          "content": {
            "application/json": {
              "schema": {
                "$ref": "#/components/schemas/FluxSchnellRequest"
              }
            }
          },
          "required": true
        },
        "responses": {
          "200": {
            "description": "Successful response",
            "content": {
              "application/json": {
                "schema": {
                  "$ref": "#/components/schemas/FluxSchnellResponse"
                }
              }
            }
          }
        }
      }
    }
  },
  "components": {
    "schemas": {
      "FluxSchnellRequest": {
        "type": "object",
        "properties": {
          "prompt": {
            "type": "string",
            "description": "The prompt to generate an image from.",
            "example": "Extreme close-up of a single tiger eye, direct frontal view. Detailed iris and pupil. Sharp focus on eye texture and color. Natural lighting to capture authentic eye shine and depth. The word \"FLUX\" is painted over it in big, white brush strokes with visible texture."
          },
          "image_size": {
            "type": "string",
            "enum": ["square_hd", "square", "portrait_4_3", "portrait_16_9", "landscape_4_3", "landscape_16_9"],
            "default": "landscape_4_3",
            "description": "The size of the generated image."
          },
          "num_inference_steps": {
            "type": "integer",
            "default": 4,
            "description": "The number of inference steps to perform."
          },
          "seed": {
            "type": "integer",
            "description": "The same seed and the same prompt given to the same version of the model will output the same image every time."
          },
          "sync_mode": {
            "type": "boolean",
            "description": "If set to true, the function will wait for the image to be generated and uploaded before returning the response. This will increase the latency of the function but it allows you to get the image directly in the response without going through the CDN."
          },
          "num_images": {
            "type": "integer",
            "default": 1,
            "description": "The number of images to generate."
          },
          "enable_safety_checker": {
            "type": "boolean",
            "default": true,
            "description": "If set to true, the safety checker will be enabled."
          }
        },
        "required": ["prompt"]
      },
      "FluxSchnellResponse": {
        "type": "object",
        "properties": {
          "images": {
            "type": "array",
            "items": {
              "type": "object",
              "properties": {
                "url": {
                  "type": "string"
                },
                "width": {
                  "type": "integer"
                },
                "height": {
                  "type": "integer"
                },
                "content_type": {
                  "type": "string"
                }
              }
            }
          },
          "timings": {
            "type": "object",
            "properties": {
              "inference": {
                "type": "number"
              }
            }
          },
          "seed": {
            "type": "integer"
          },
          "has_nsfw_concepts": {
            "type": "array",
            "items": {
              "type": "boolean"
            }
          },
          "prompt": {
            "type": "string"
          }
        }
      }
    },
    "securitySchemes": {
      "ApiKeyAuth": {
        "type": "apiKey",
        "in": "header",
        "name": "Authorization",
        "description": "API key authentication. Format: Key {API_KEY}"
      }
    }
  }
}
Step 3 - Add the FLUX Schnell API Action to Suppa
Now that you have your API key, you can add the FLUX Schnell API action to your Suppa digital assistant.
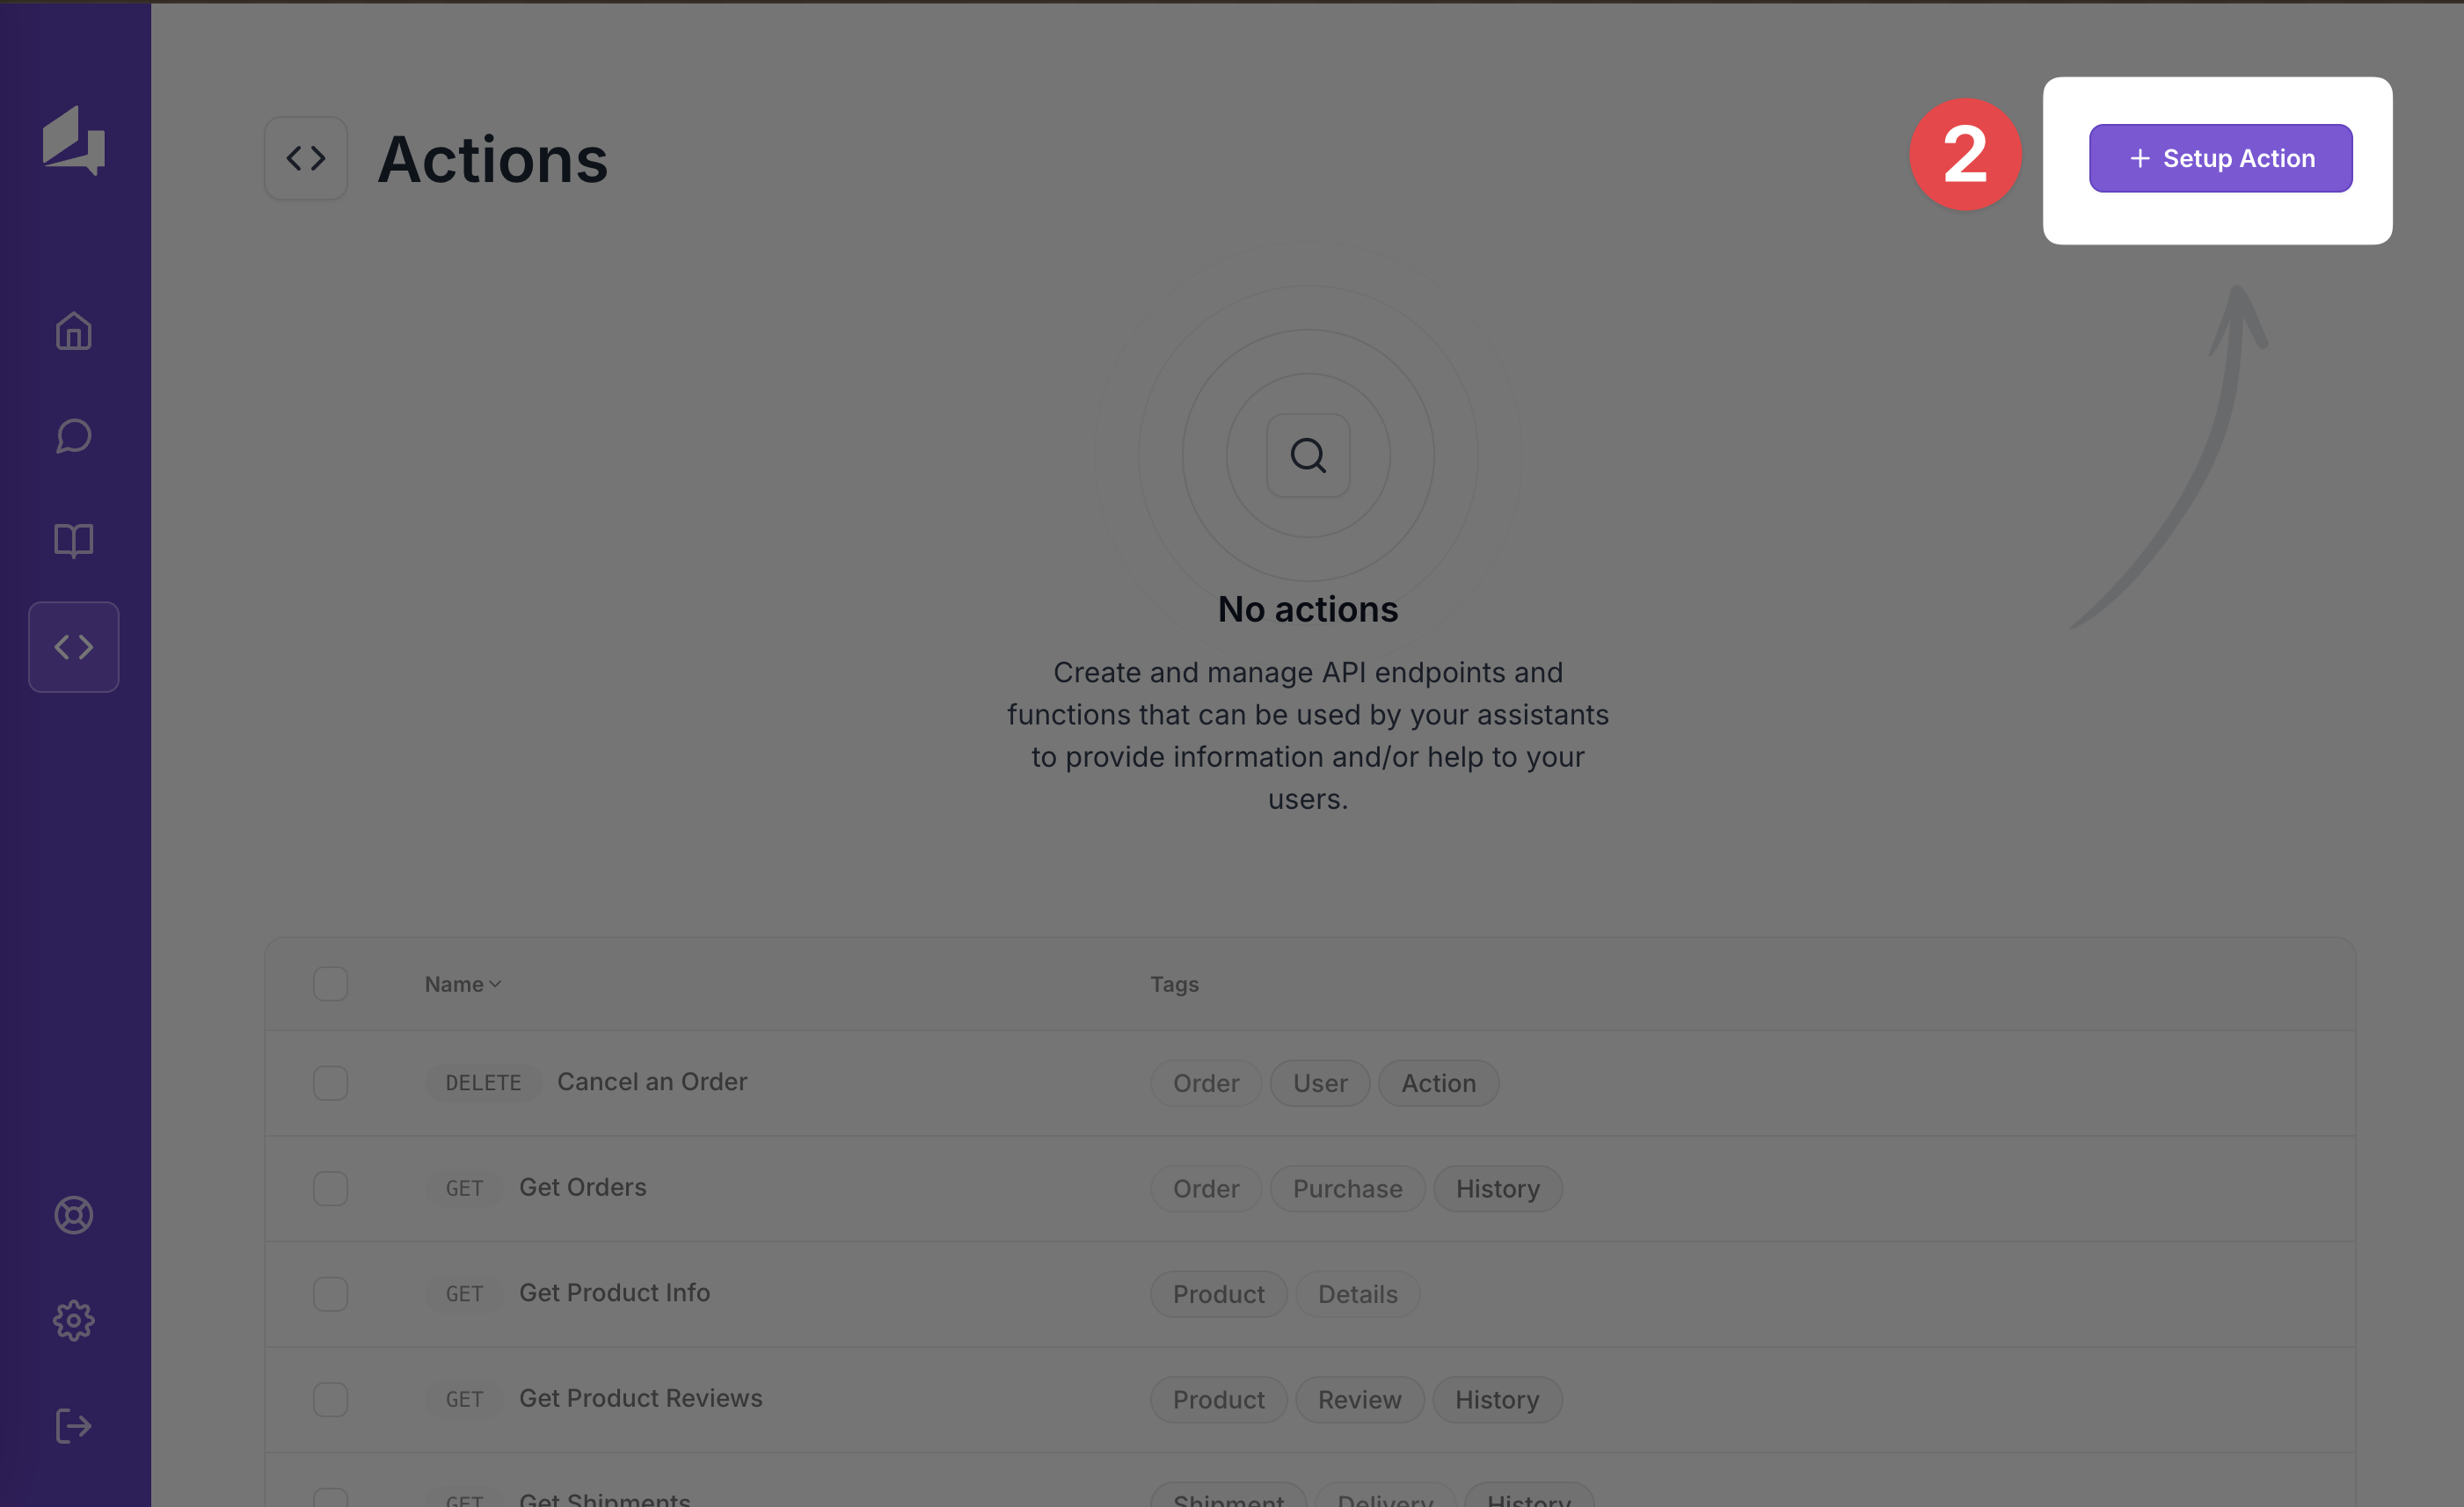
- Navigate to the Action management section in your Suppa dashboard.
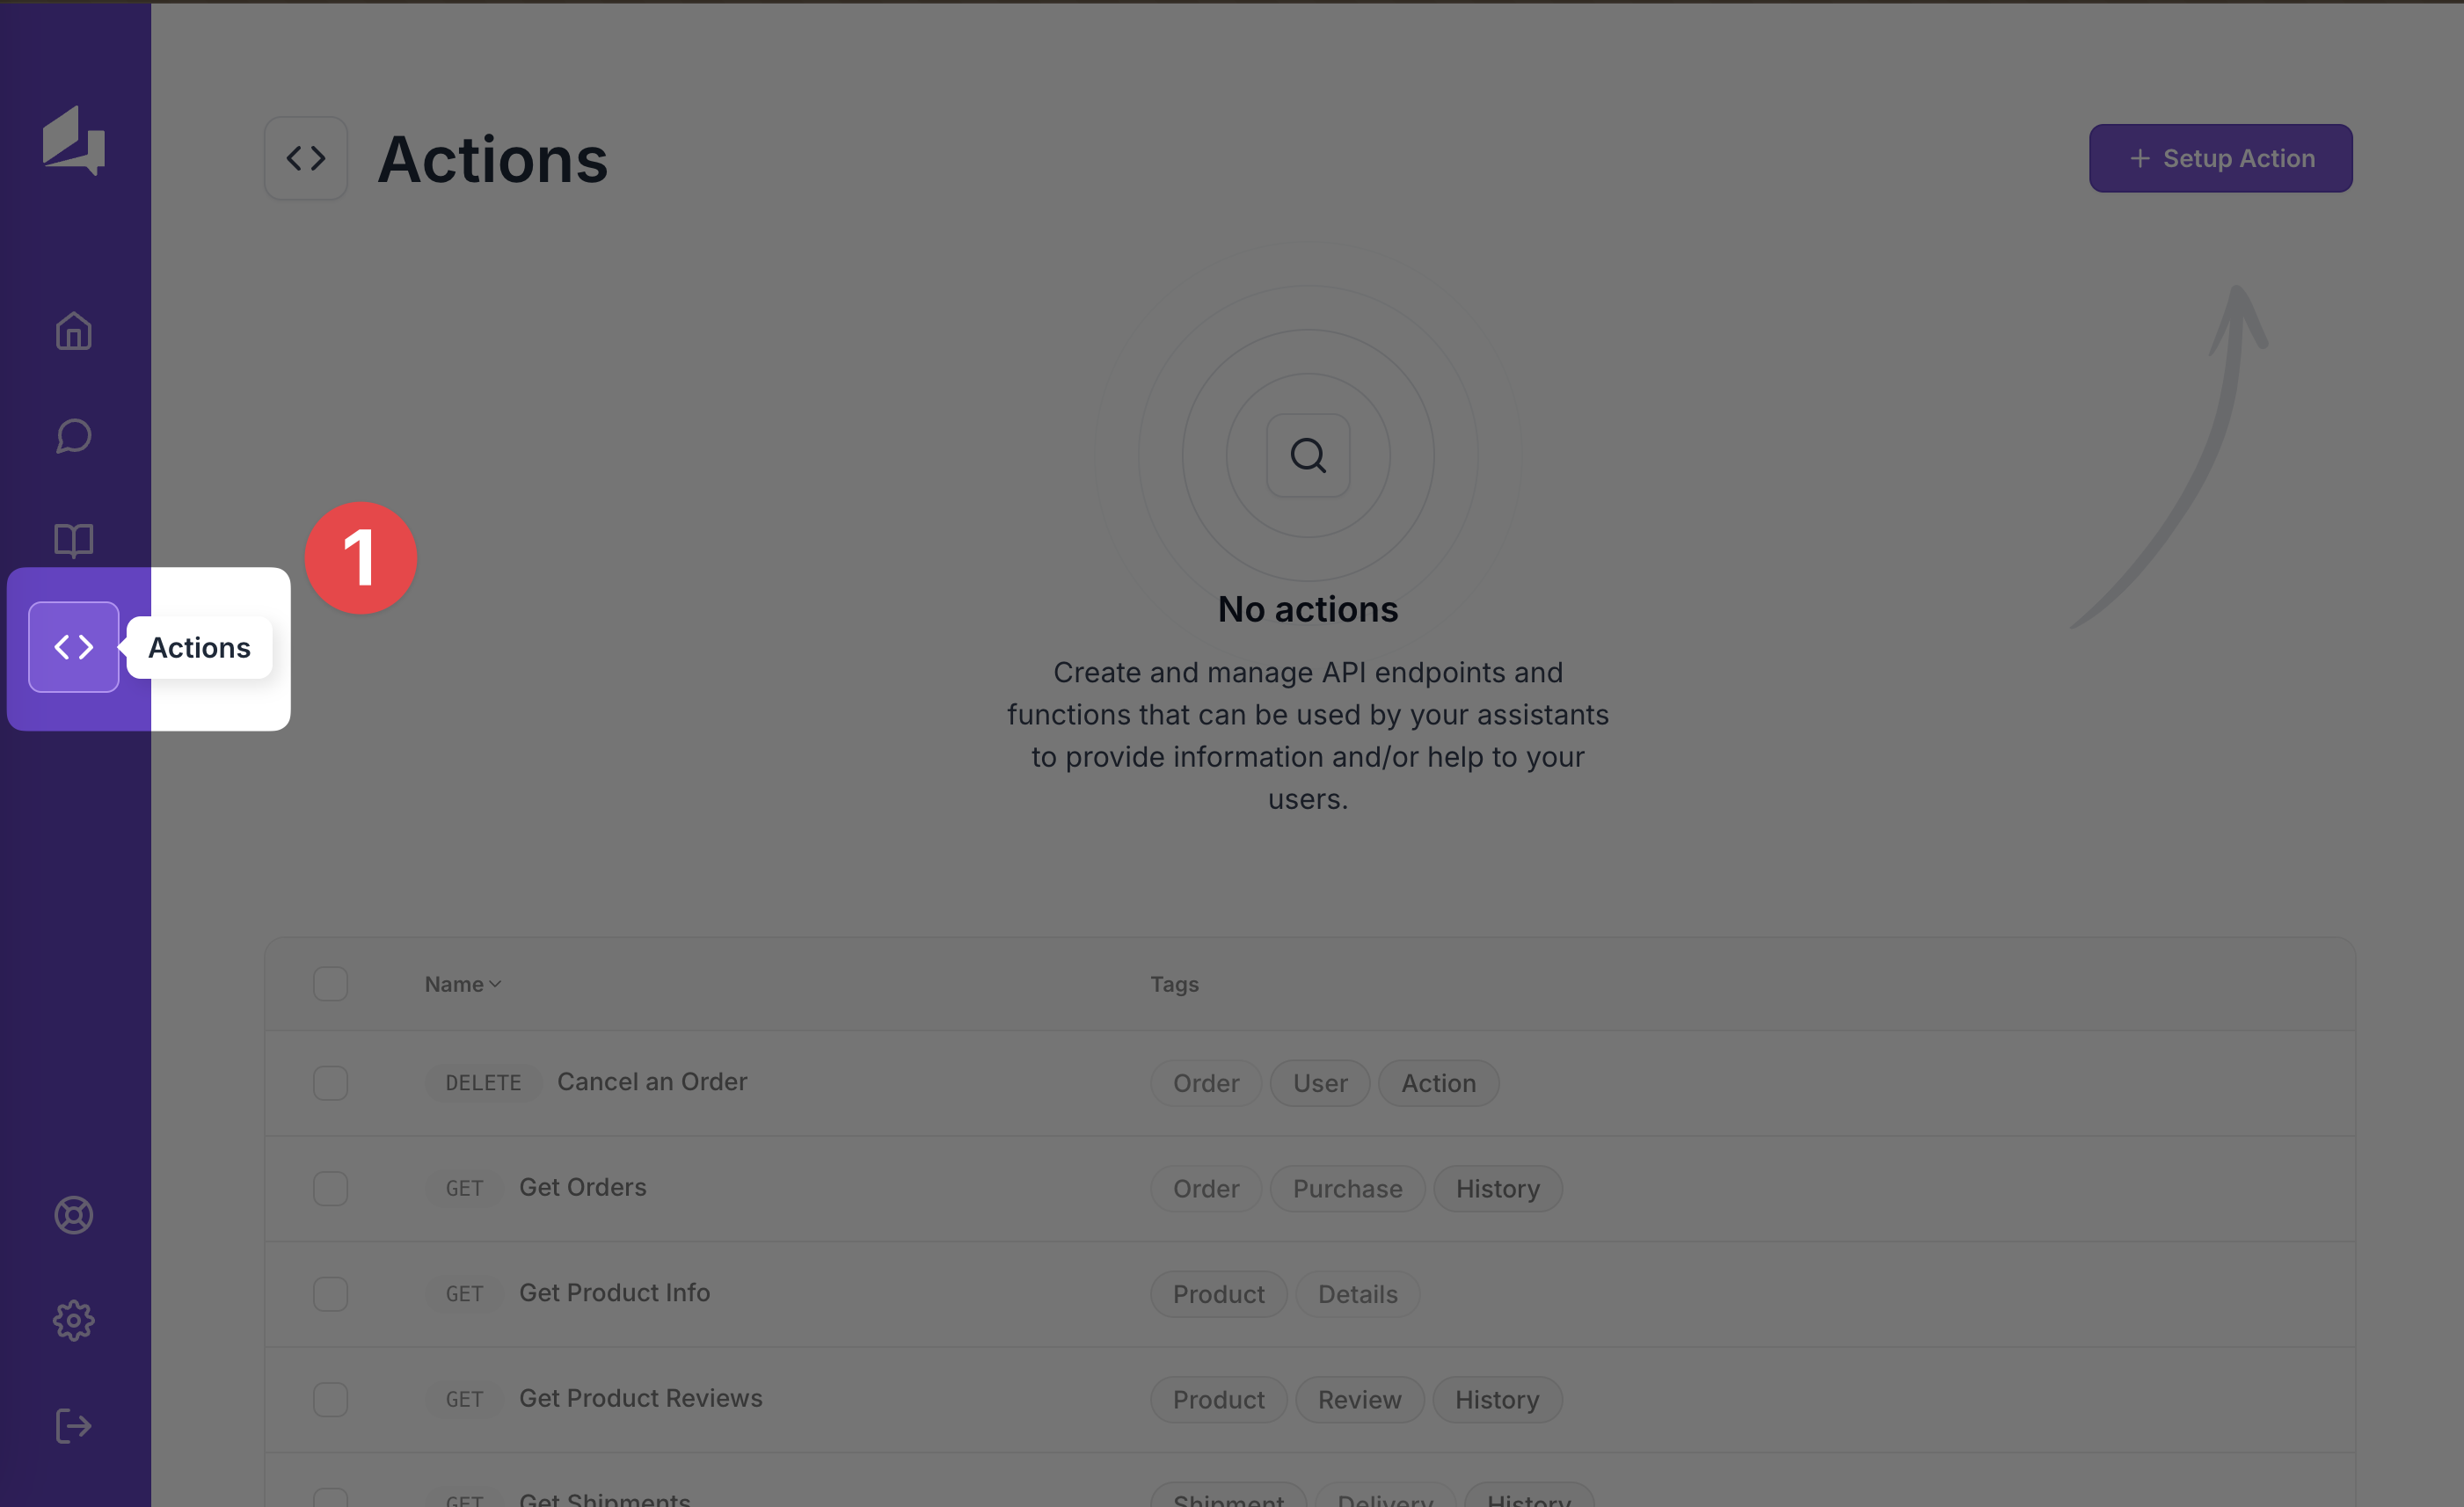
- Click on the "Setup API" button to open the setup modal.
- Fill in the following fields:
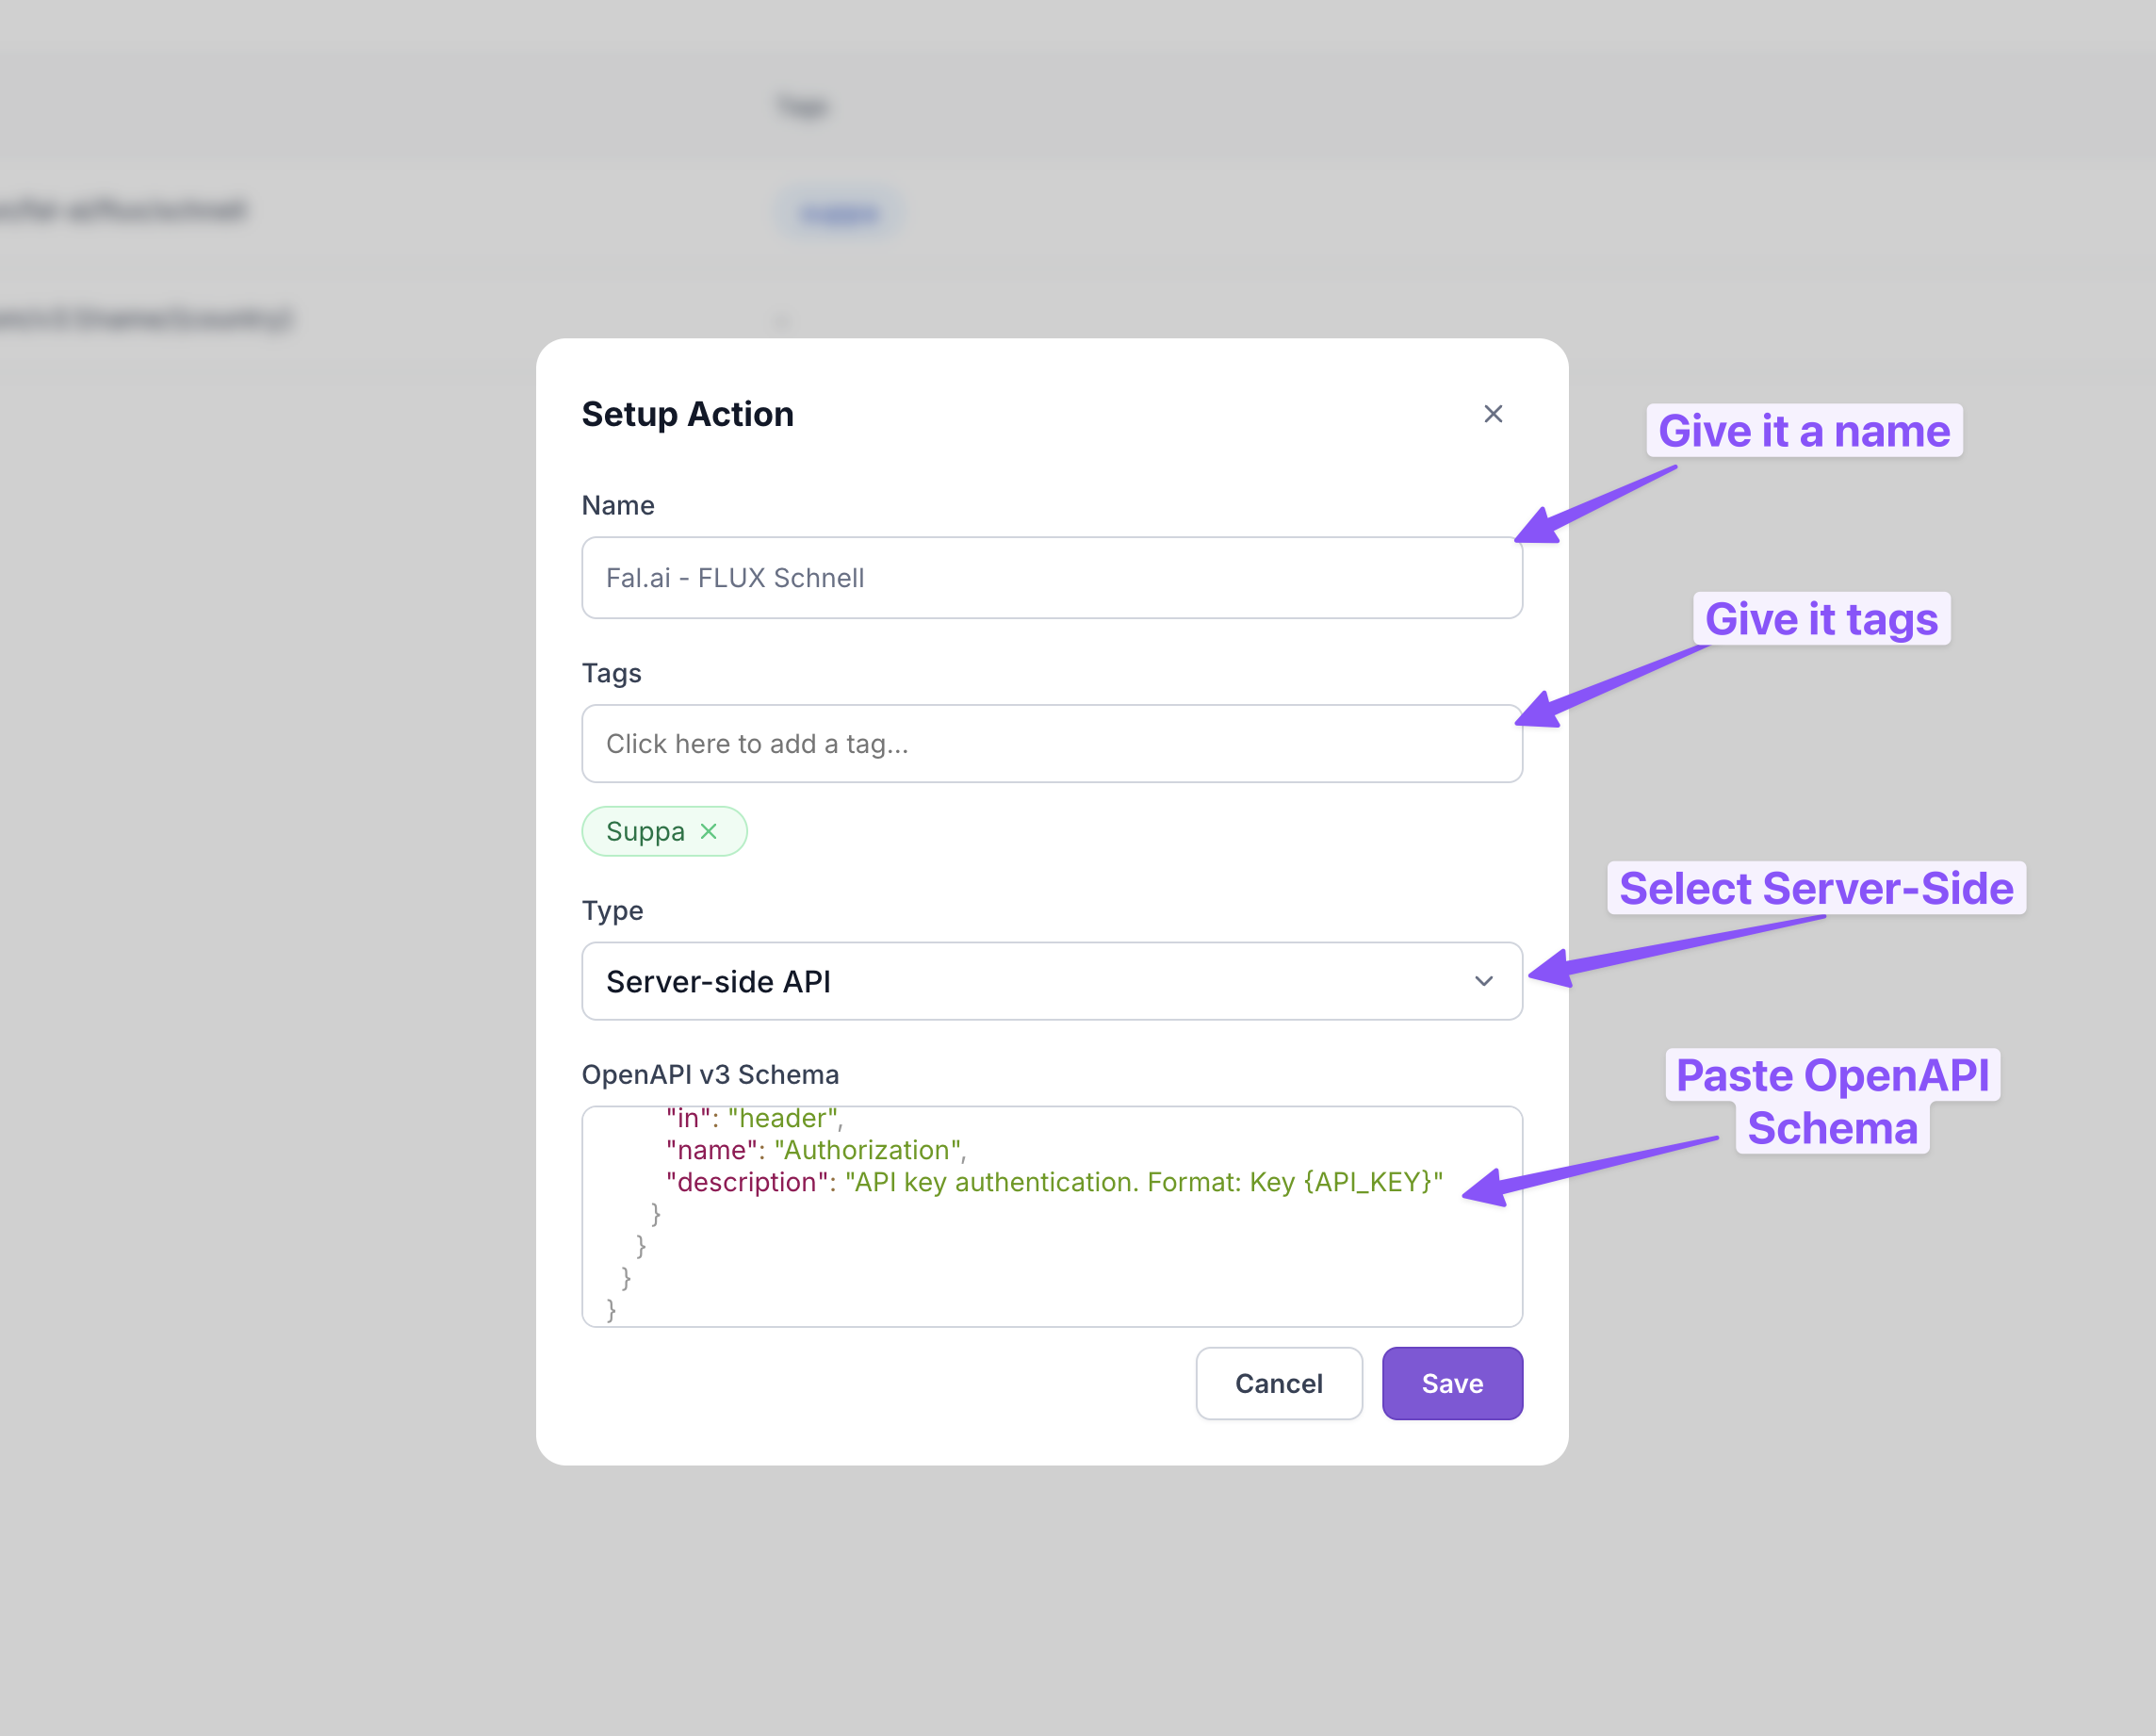
Since the FLUX Schnell API requires an API key for authentication, we use the server-side action type to prevent exposing the key to the client-side.
Step 4 - Use Action in Canvas
Once you have added the FLUX Schnell API action to your Suppa digital assistant, you can use it in your flows.
Here is a sample flow to generate an image using the FLUX Schnell API by asking the user for a prompt:
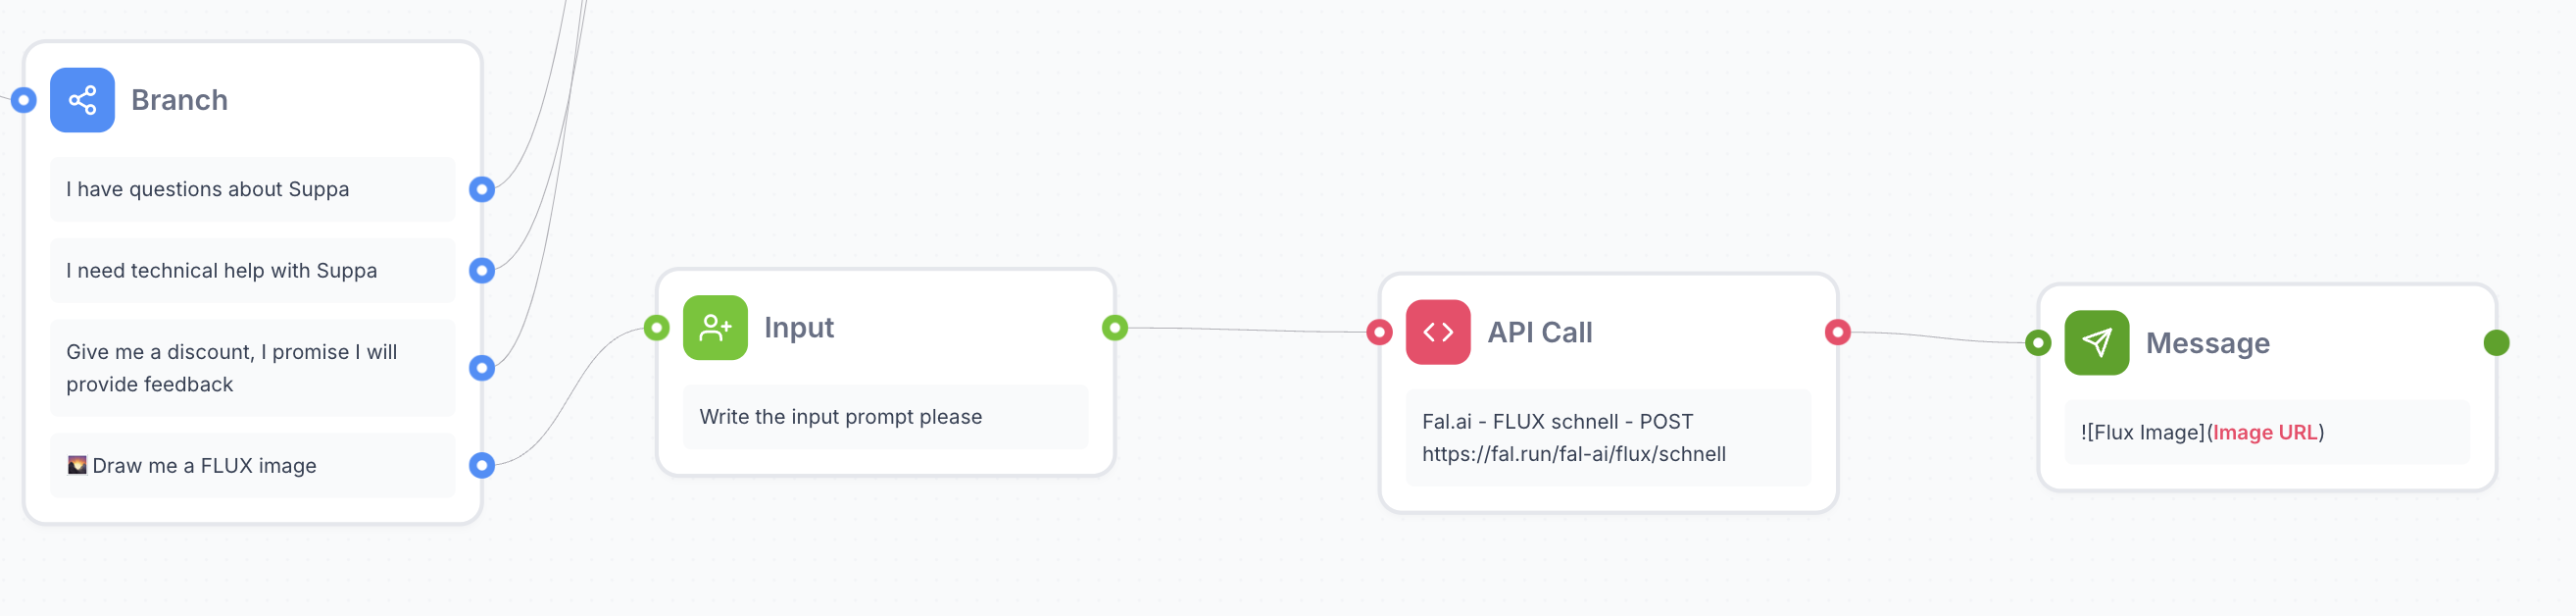
Ask User for Prompt
You can ask the user for a prompt to generate an image using the FLUX Schnell API using the Input node
Add FLUX API Action
Next, you can add the FLUX Schnell API action to your flow using the API Call node. Here we need to setup the API call to use the prompt provided by the user, add our API key, specify the image size and other parameters, and extract the generated image URL from the response.
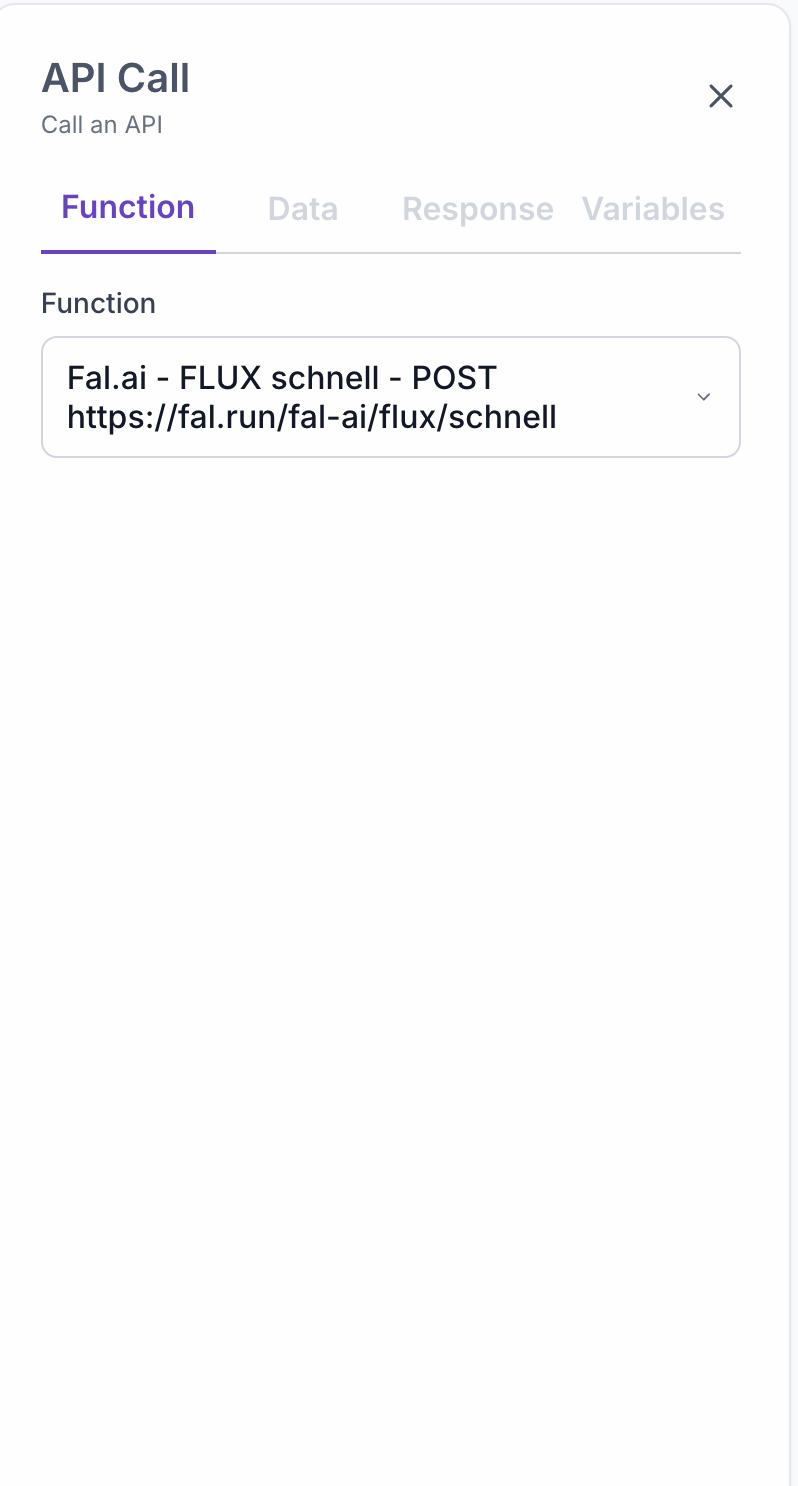
First, we choose the action we created earlier from the dropdown list.
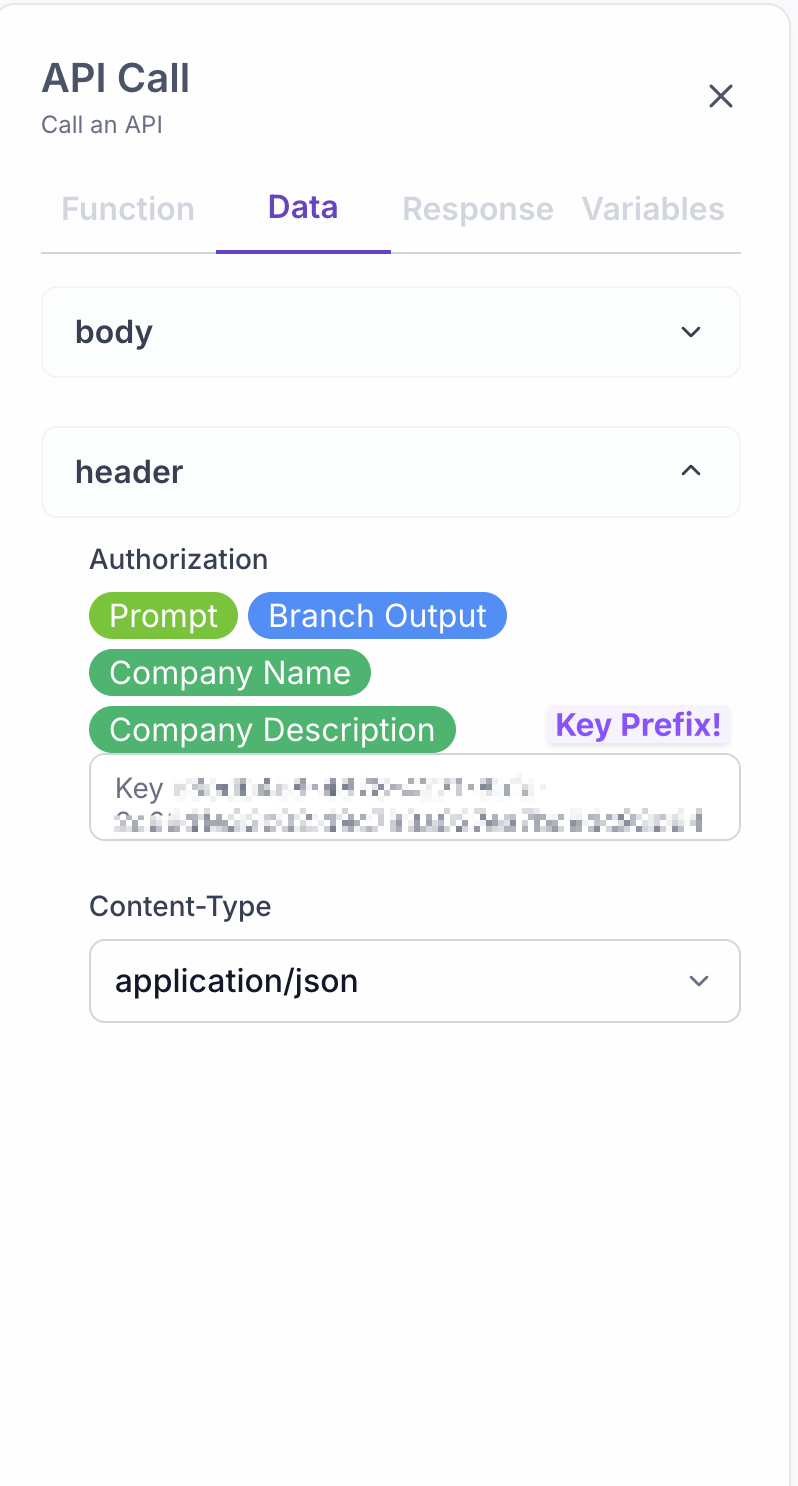
Next, we set the parameters for the API call. We first need to setup the header parameters for the API key and content type. Do not forget to add Key before your API key as Fal.ai expects it in this format.
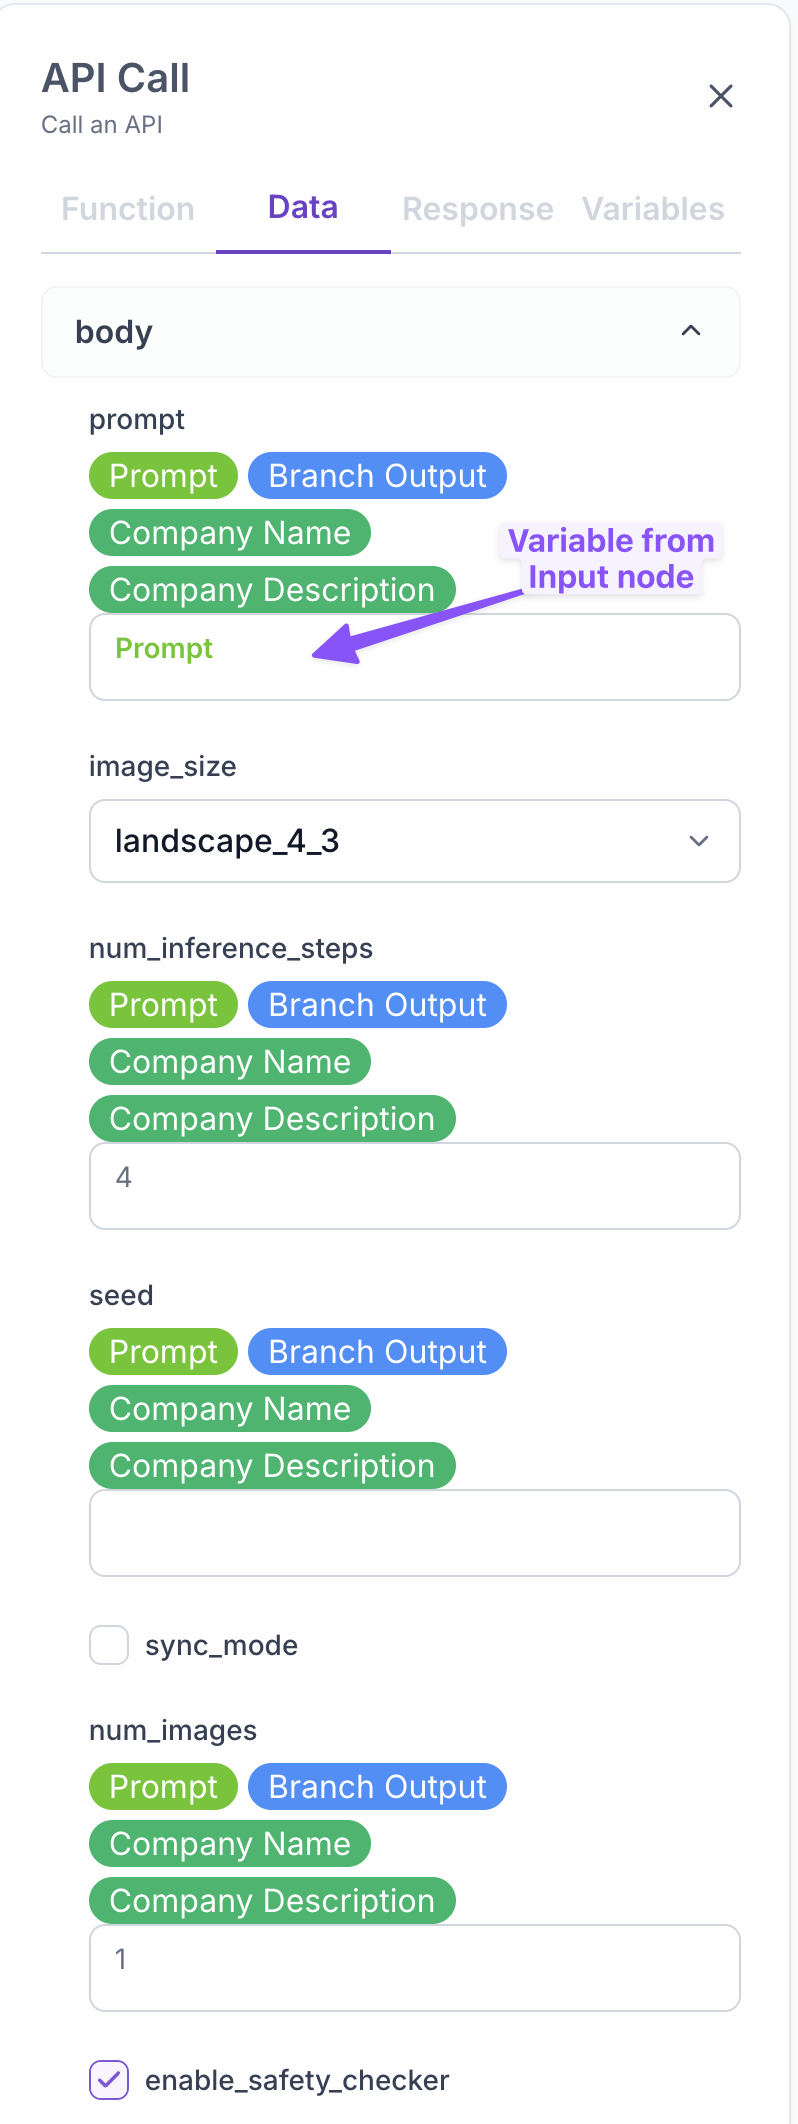
Then, we set the request body parameters for the API call. Here we use the Prompt variable which is the prompt provided by the user in the Input node. We also specify the image_size and other parameters as needed.
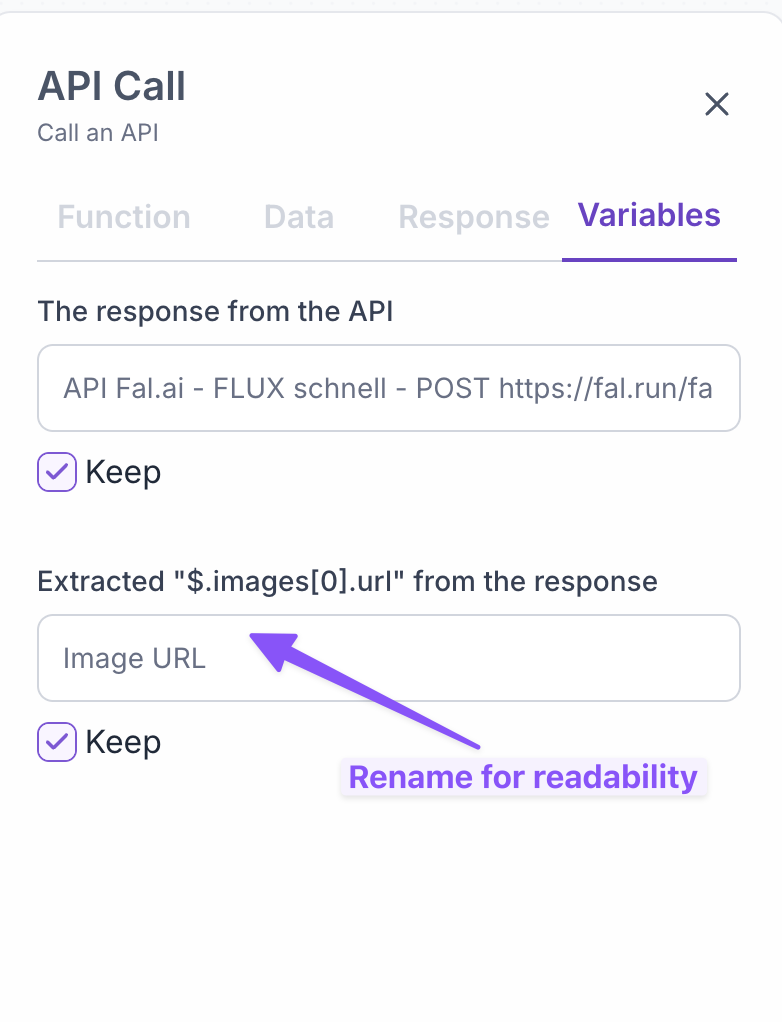
Finally, we extract the generated image URL from the response and display it to the user using the JSONPath expression.
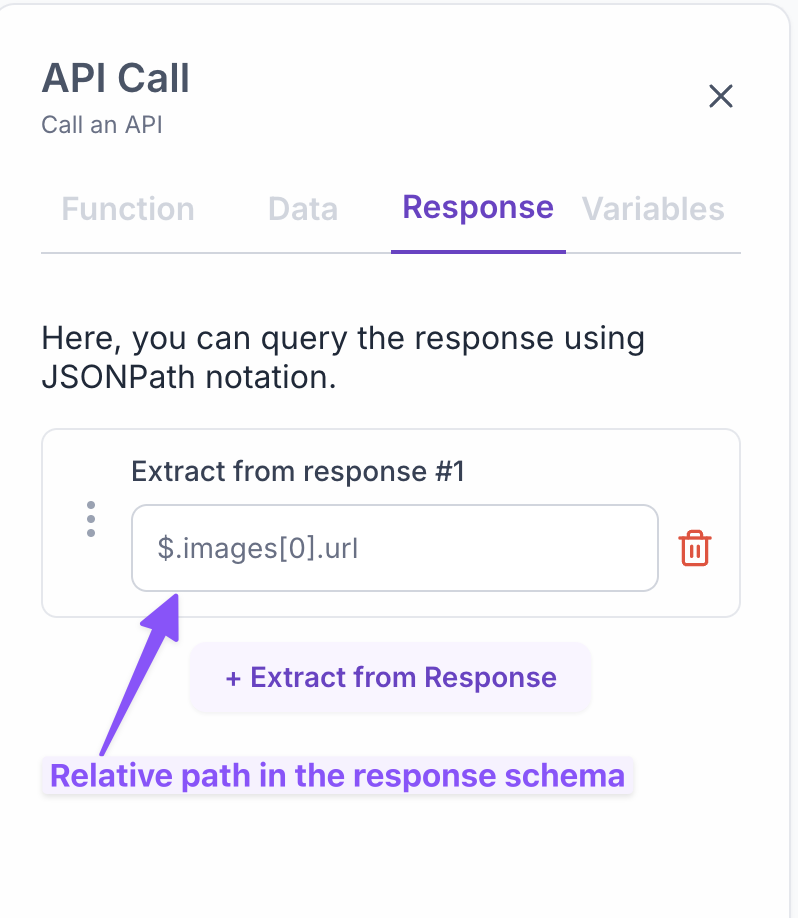
Additionally, we can set the image URL as a variable to use it in the upcoming nodes in the flow.
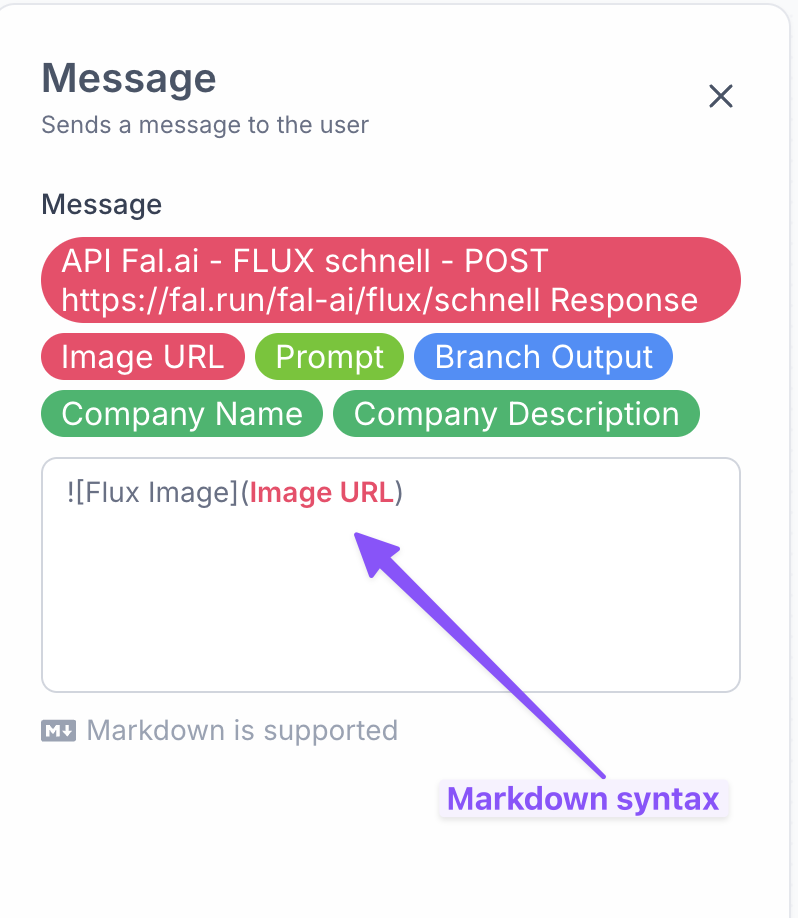
Display Image to User
We can simply connect a Message node to the API Call node and display the generated image to the user by setting the image URL as the message content.
Demo Video
Here is a video that shows the FLUX image generation in action using the Fal.ai API:
Conclusion
We have successfully added the FLUX Schnell API from Fal.ai to our Suppa digital assistant and used it to generate images based on user prompts.
You can adapt this example to integrate other APIs and services into your Suppa assistant to provide a wide range of functionalities to your users. Happy building!